A/B test changes to your Shopify checkout to see what lifts orders and revenue.
A checkout test splits your visitors into test groups, shows each test group a different checkout, and measures which completes more orders. You decide what every test group sees, and ABConvert compares the results.
Checkout tests are available on all ABConvert plans. Delivery and Payment changes work on any Shopify plan. Content, Cart, and Upsell changes require Shopify Plus.
Choose the Checkout type, name the test, set a hypothesis, pick your primary metric, and add the variants to test against Control.
2
Set targeting
Decide who enters the test and how much traffic it gets. See Targeting.
3
Add modifications and preview as you build
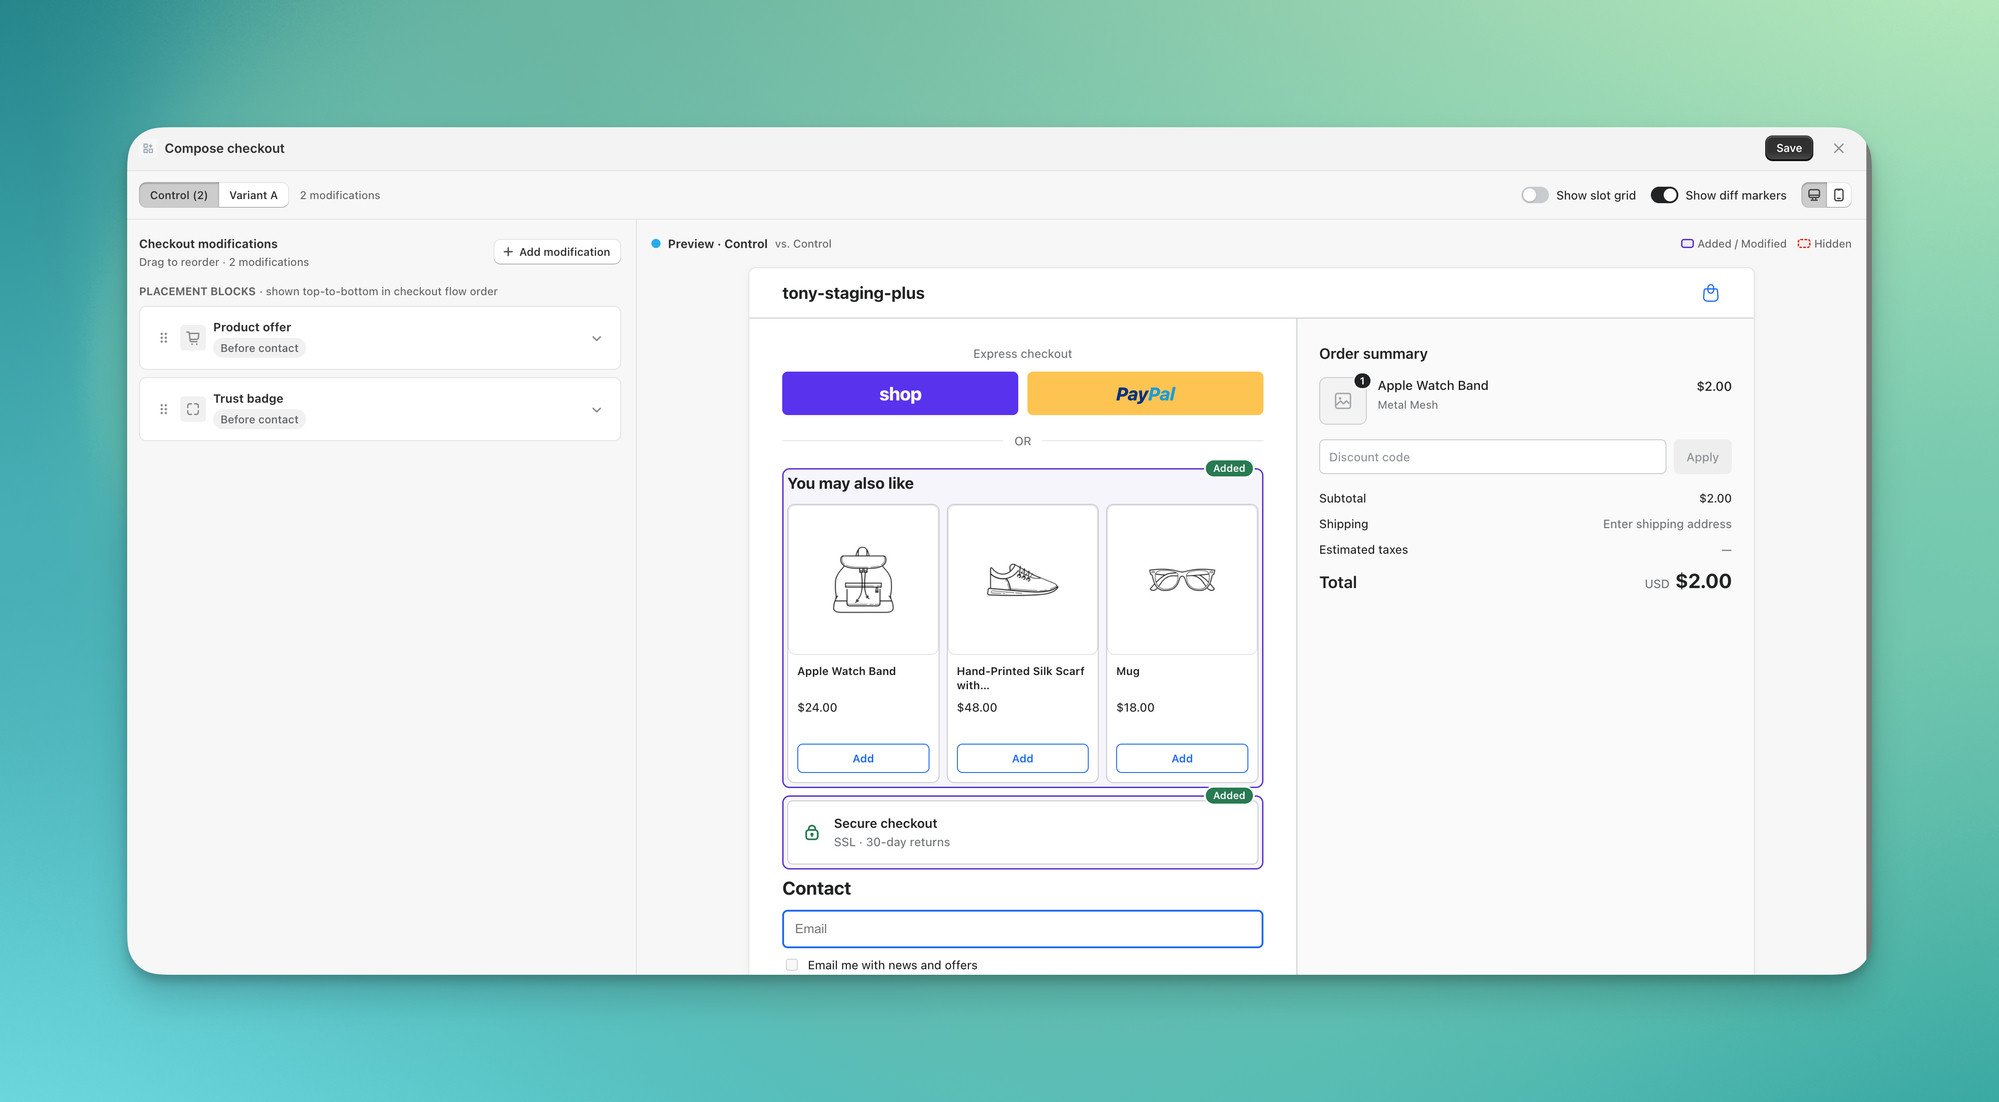
Open the Compose checkout editor for a test group, click Add change, pick a category, and configure it.A live preview on the right updates as you build, and the tabs at the top switch which test group you’re previewing. It’s an approximation of your checkout; confirm the real thing on your storefront before launch (see Preview on your storefront).
Compose checkout editor with live preview.
Two toggles help while you build:
Show diff markers flags how the test group differs from the original checkout page: Added and Modified blocks get a solid ring, Hidden ones a dashed ring.
Desktop / Mobile switches the viewport.
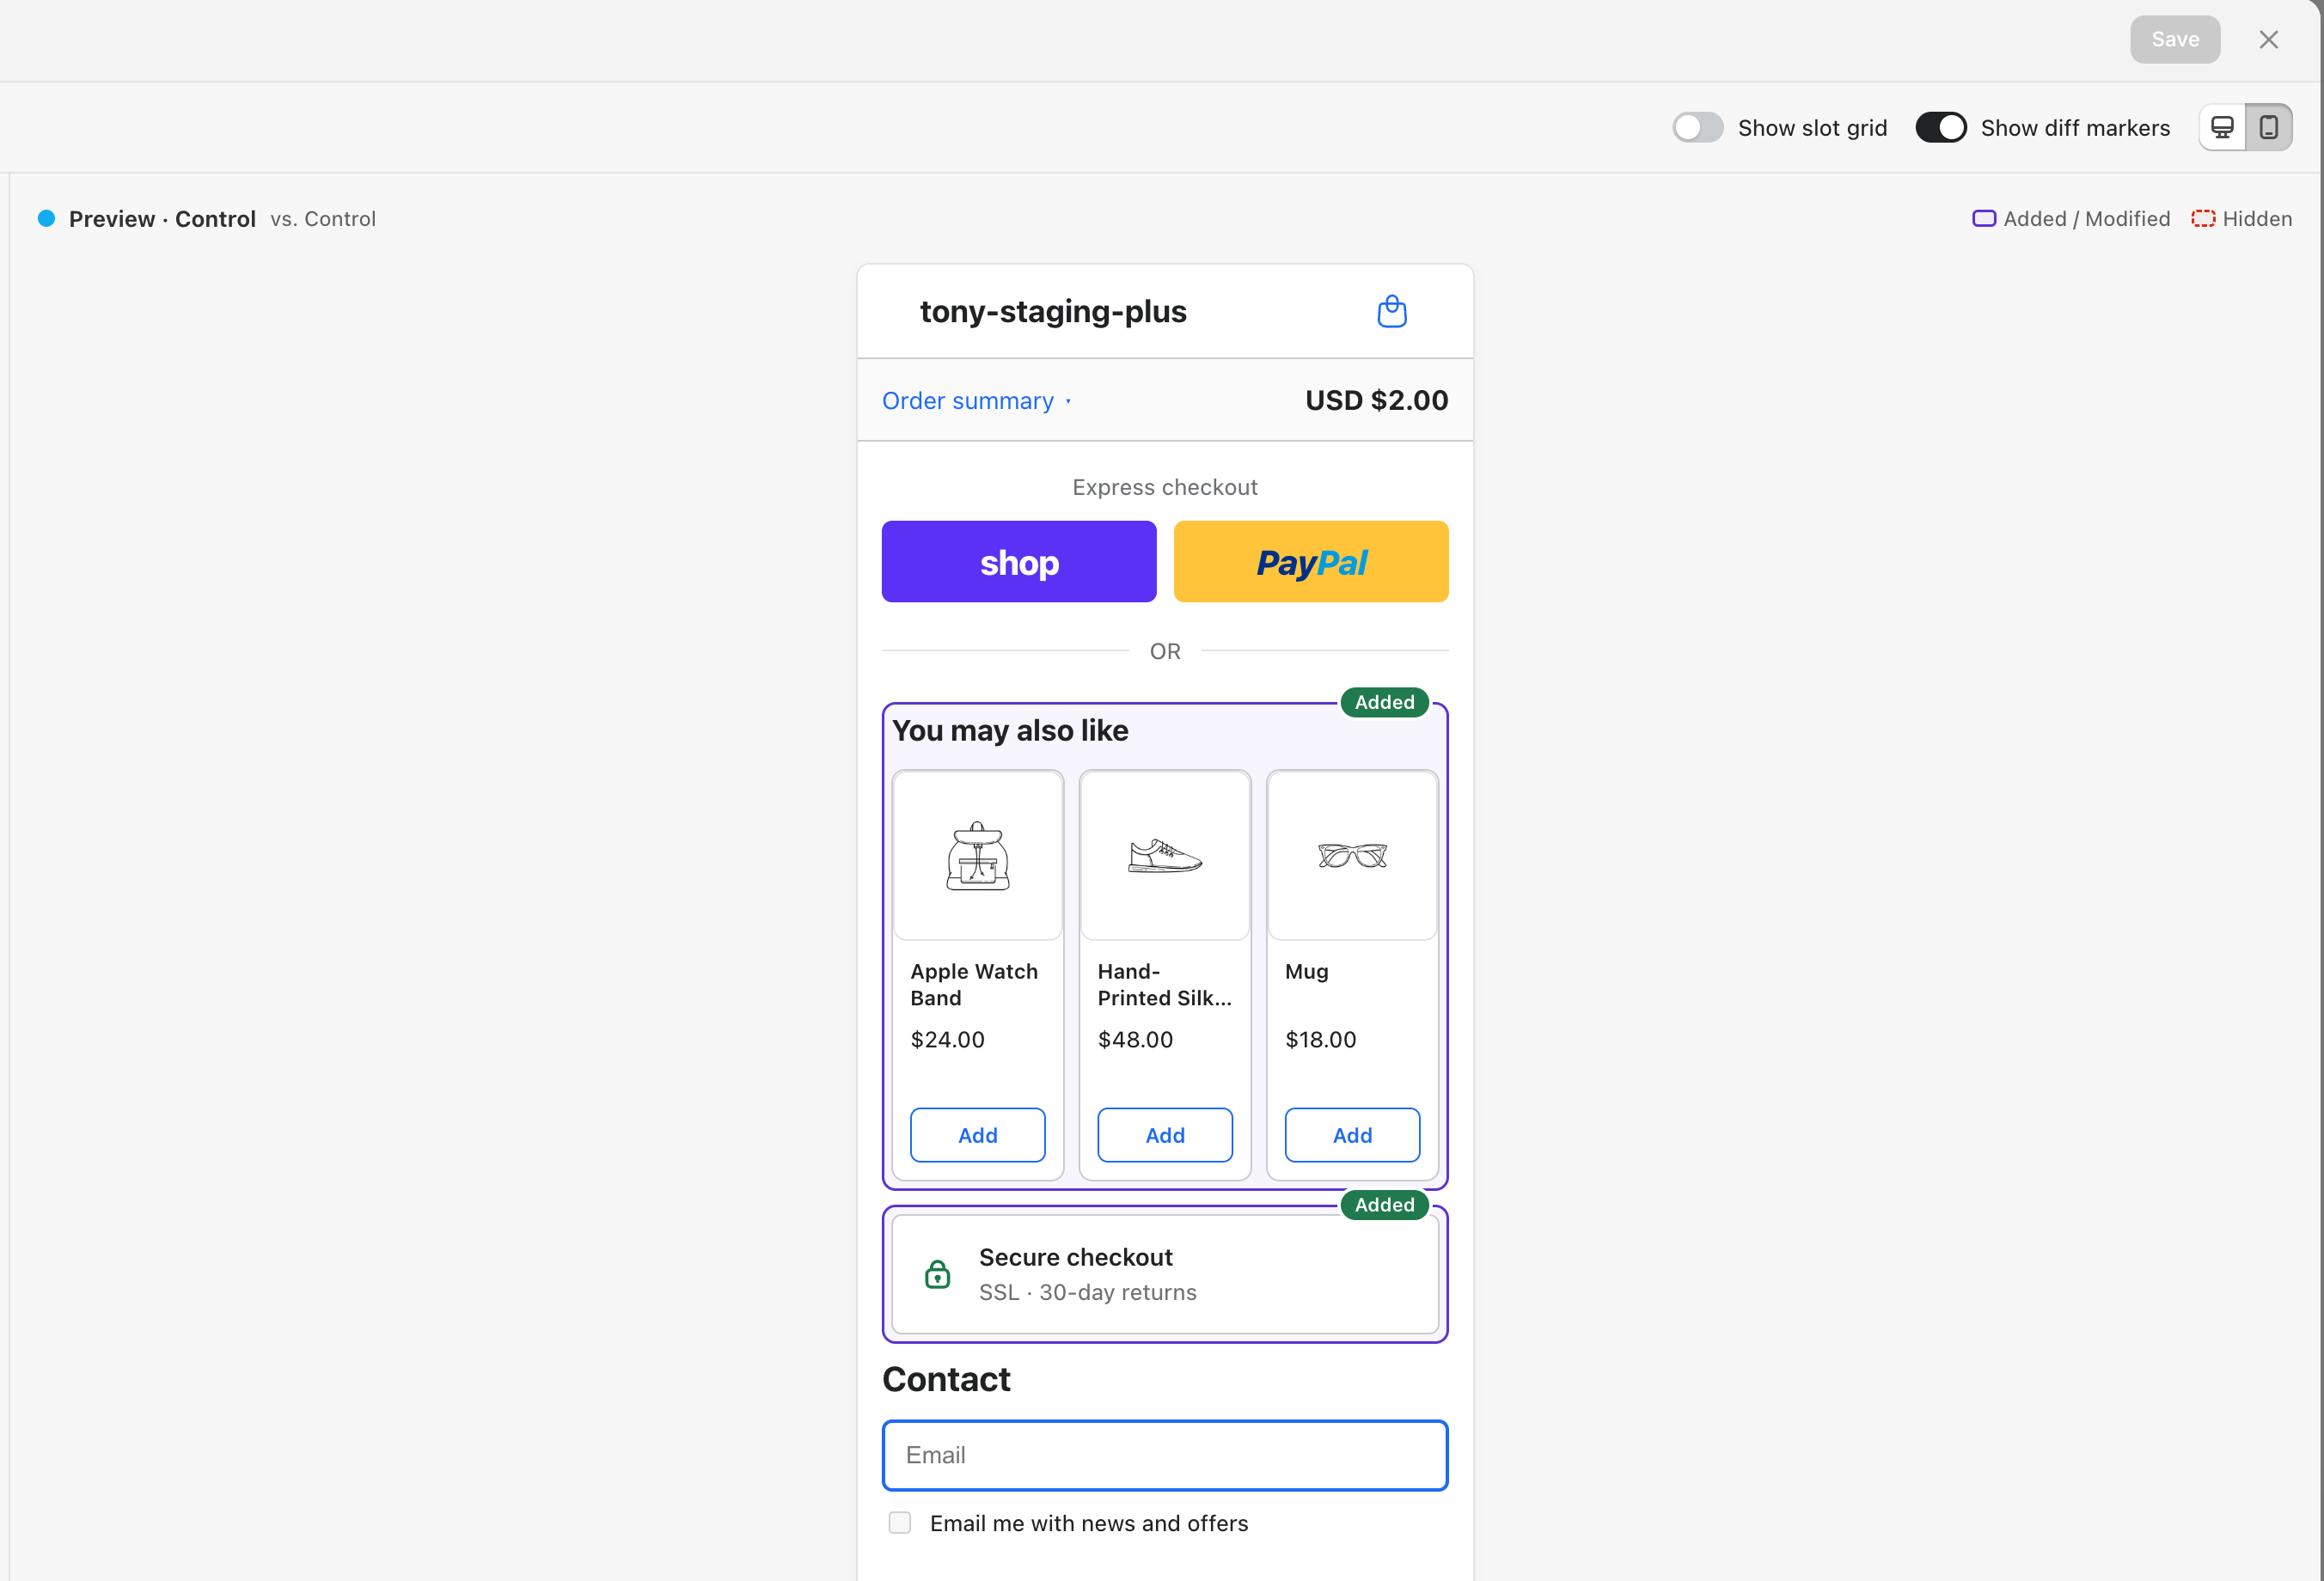
Check the Mobile viewport too. Most checkout traffic is on mobile, and the desktop and mobile views can differ, so a block that looks right on one may not on the other.
Mobile viewport preview.
4
Save and add your blocks
Click Save. ABConvert shows a card listing the blocks to add in the Shopify checkout editor. See Add your blocks.
5
Preview and launch
Preview every test group on your storefront to confirm each renders correctly, then click Launch test. See Preview on your storefront.
Add the listed blocks exactly where ABConvert shows them, or your test won’t render.
Adding ABConvert blocks and pasting Block IDs in the checkout editor.
Content, Cart, and Upsell changes render through ABConvert blocks you place in Shopify’s checkout editor. (Delivery and Payment changes apply automatically, with no block to add.) After you save, the Add your blocks card lists two kinds of block:
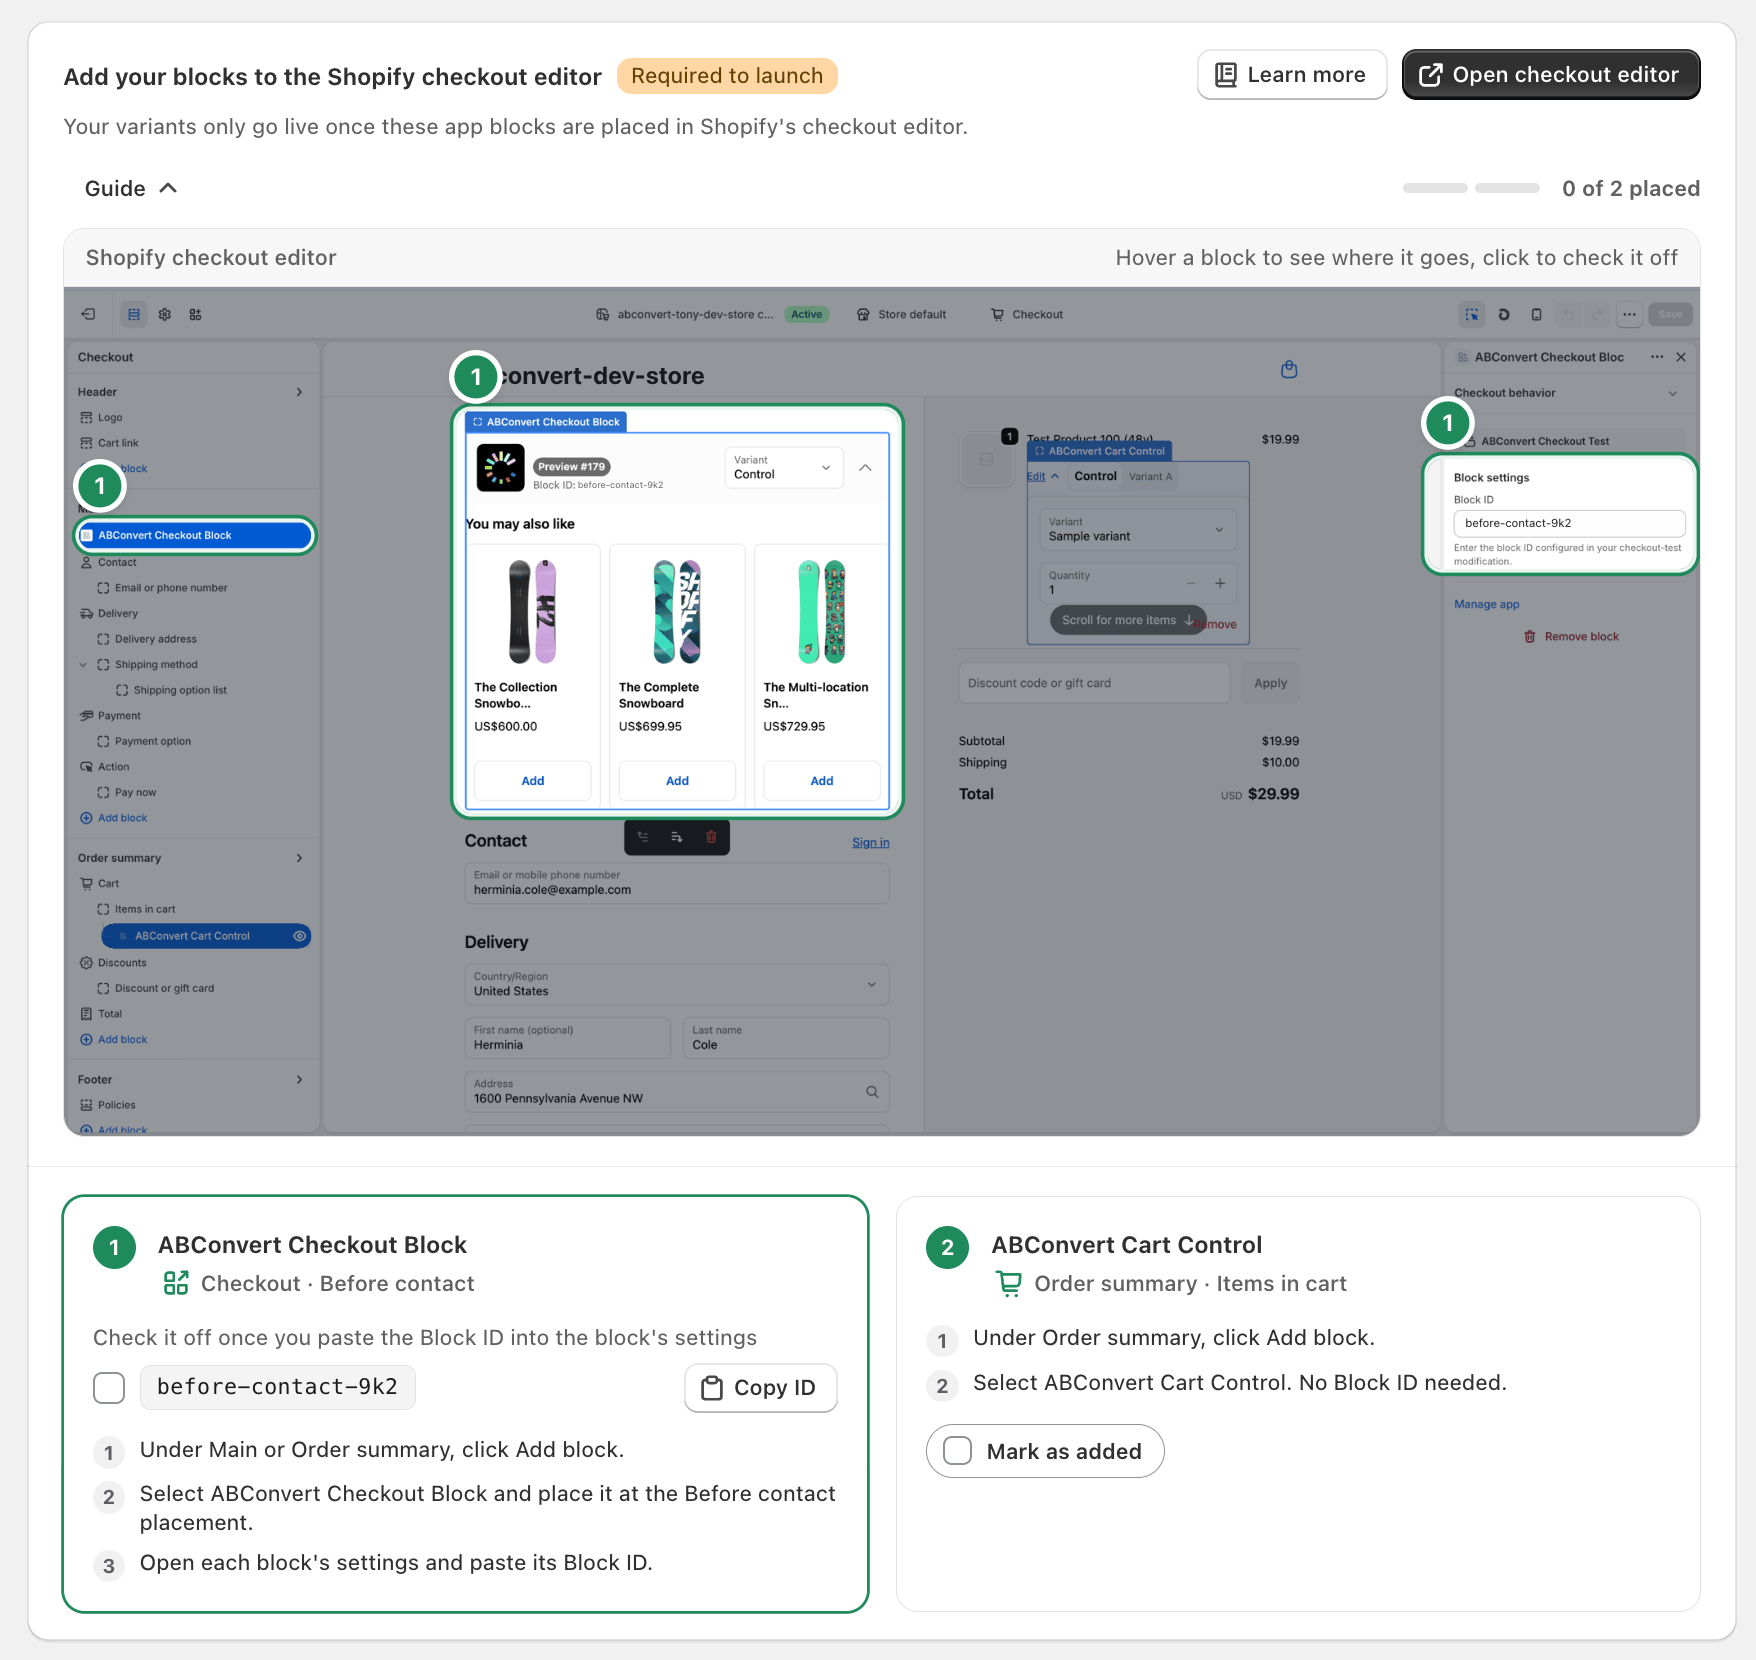
ABConvert Checkout Block renders your Content and Upsell changes. Add one at each placement the card lists.
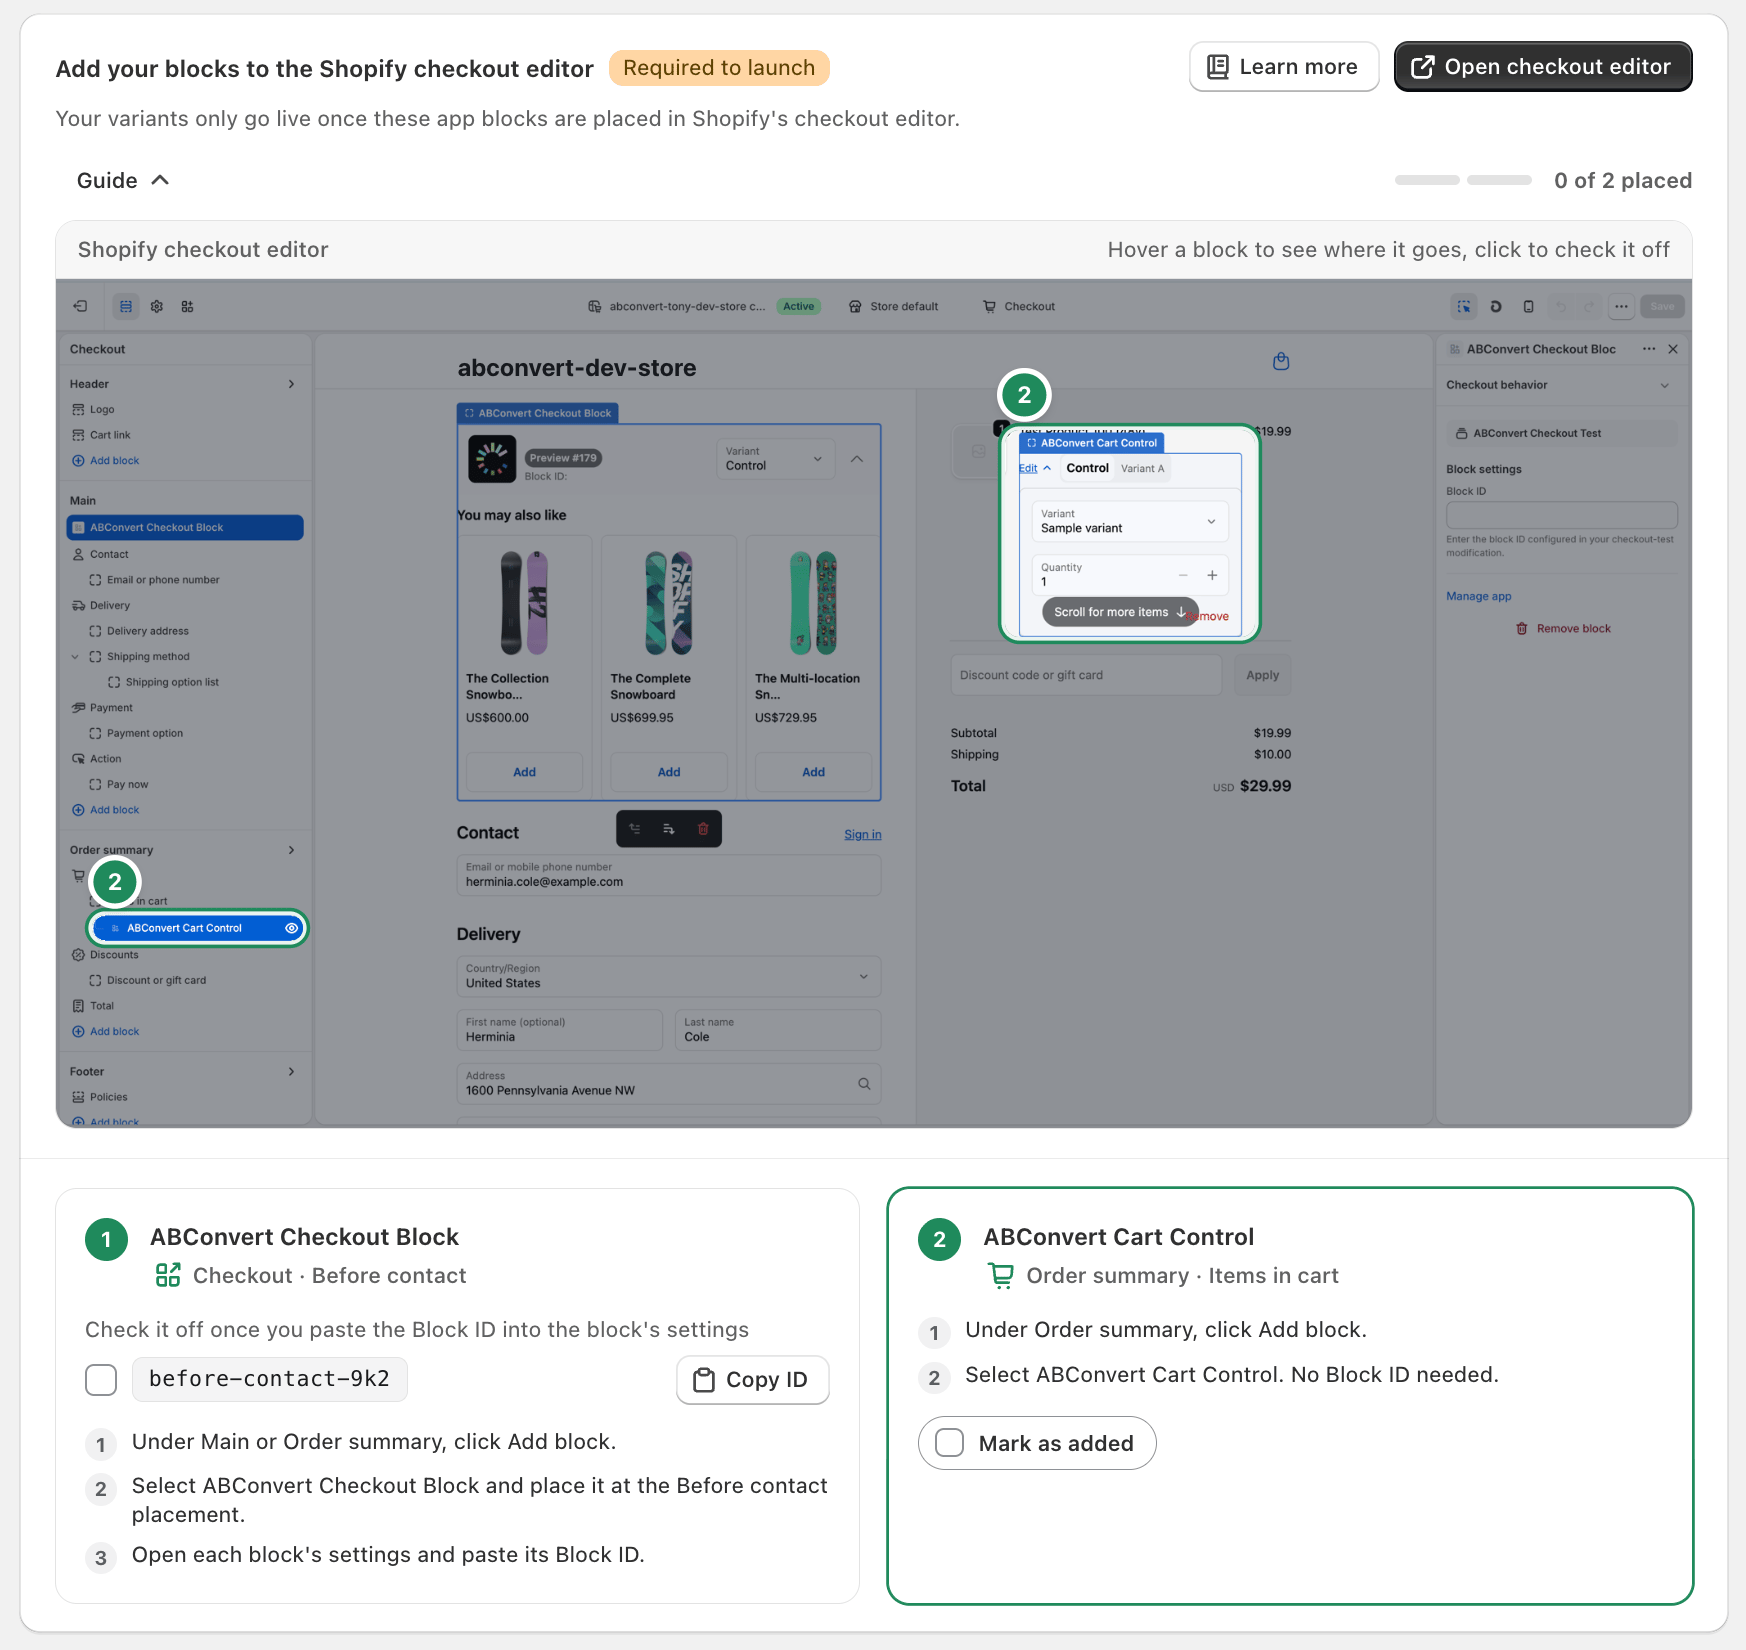
ABConvert Cart Control renders your Cart changes. Add one in Order summary.
ABConvert Checkout Block
ABConvert Cart Control
Placement guide for the ABConvert Checkout Block.
Placement guide for the ABConvert Cart Control.
What a Block ID is. Each Checkout Block placement has a short code like before-contact-bpa. It links a block you add in Shopify’s checkout editor back to the changes you configured for that spot in ABConvert. You paste the Block ID into the block’s settings so ABConvert knows what to render there. Each Block ID belongs to exactly one placement.
1
Open the Shopify checkout editor
Click Open checkout editor on the card. It opens the editor in a new tab, jumped to the Apps tab, so ABConvert stays open beside it.
2
Place a Checkout Block and paste its Block ID
Click Add app block, open ABConvert Checkout Test, and add an ABConvert Checkout Block at each placement the card lists. Then paste that placement’s Block ID into the block’s Block ID field in the checkout editor’s settings panel.
3
Add the Cart Control block (if you test Cart modifications)
Add ABConvert Cart Control in the Order summary section. It has no Block ID and renders its controls on each cart line automatically.
4
Save, then check each placement off in ABConvert
Click Save in the checkout editor (blocks aren’t applied until you save), then return to ABConvert and check off each placement on the card.
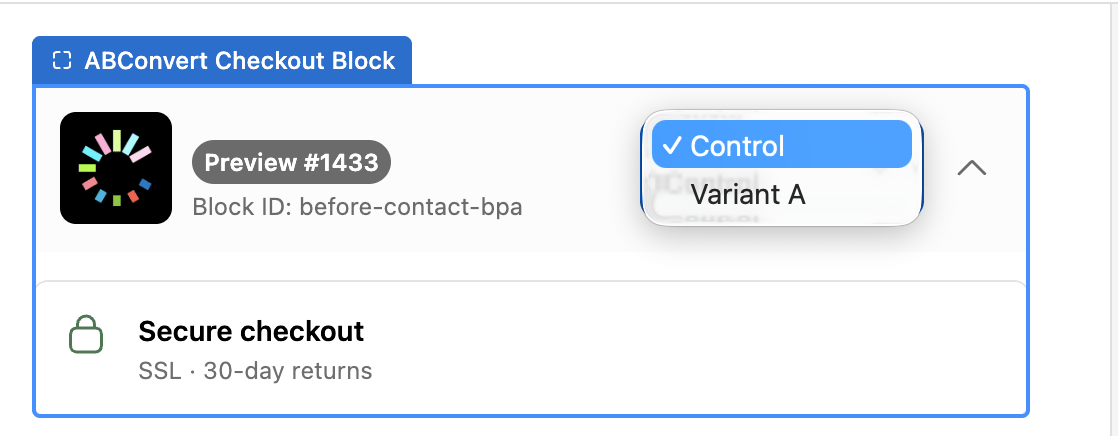
While you’re in the checkout editor, each ABConvert block shows a Preview header with its Block ID and a Variant dropdown. Switch the dropdown to render each test group’s content and confirm your blocks land in the right spot. If a test group has no change for a block, it shows a Block hidden banner.
The Variant dropdown in a block Preview header.
If you change changes in ABConvert while the checkout editor is open, refresh the editor to load the latest version.
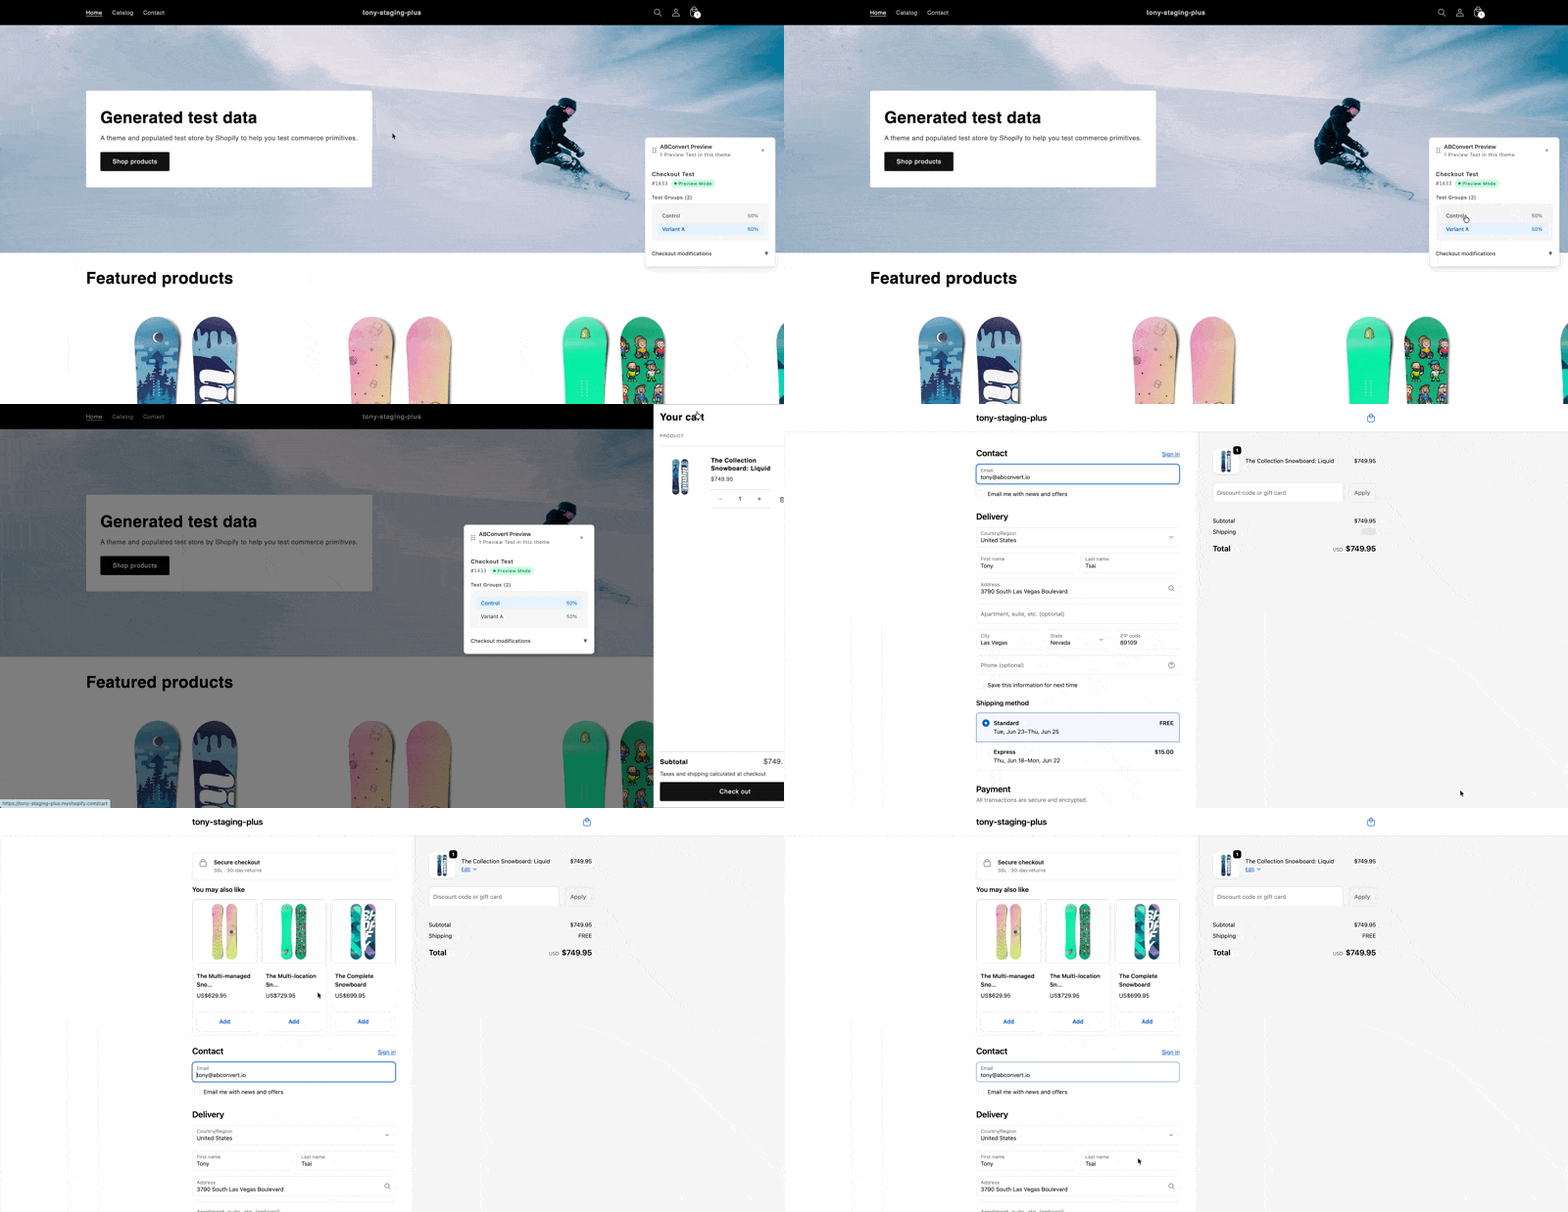
Before launching, walk the full shopper path to checkout on your real storefront, as any test group you choose. This is the standard pre-launch preview for every ABConvert test type. See Preview before you launch.
In the Preview Test card on the review step, click Open.
An ABConvert Preview widget appears. Choose the test group you want to walk through as.
Browse to your cart and checkout. The blocks render the same way a real shopper would see them.
The storefront preview flow.
Preview is only visible to you. Real shoppers never see the test while it’s in Preview.
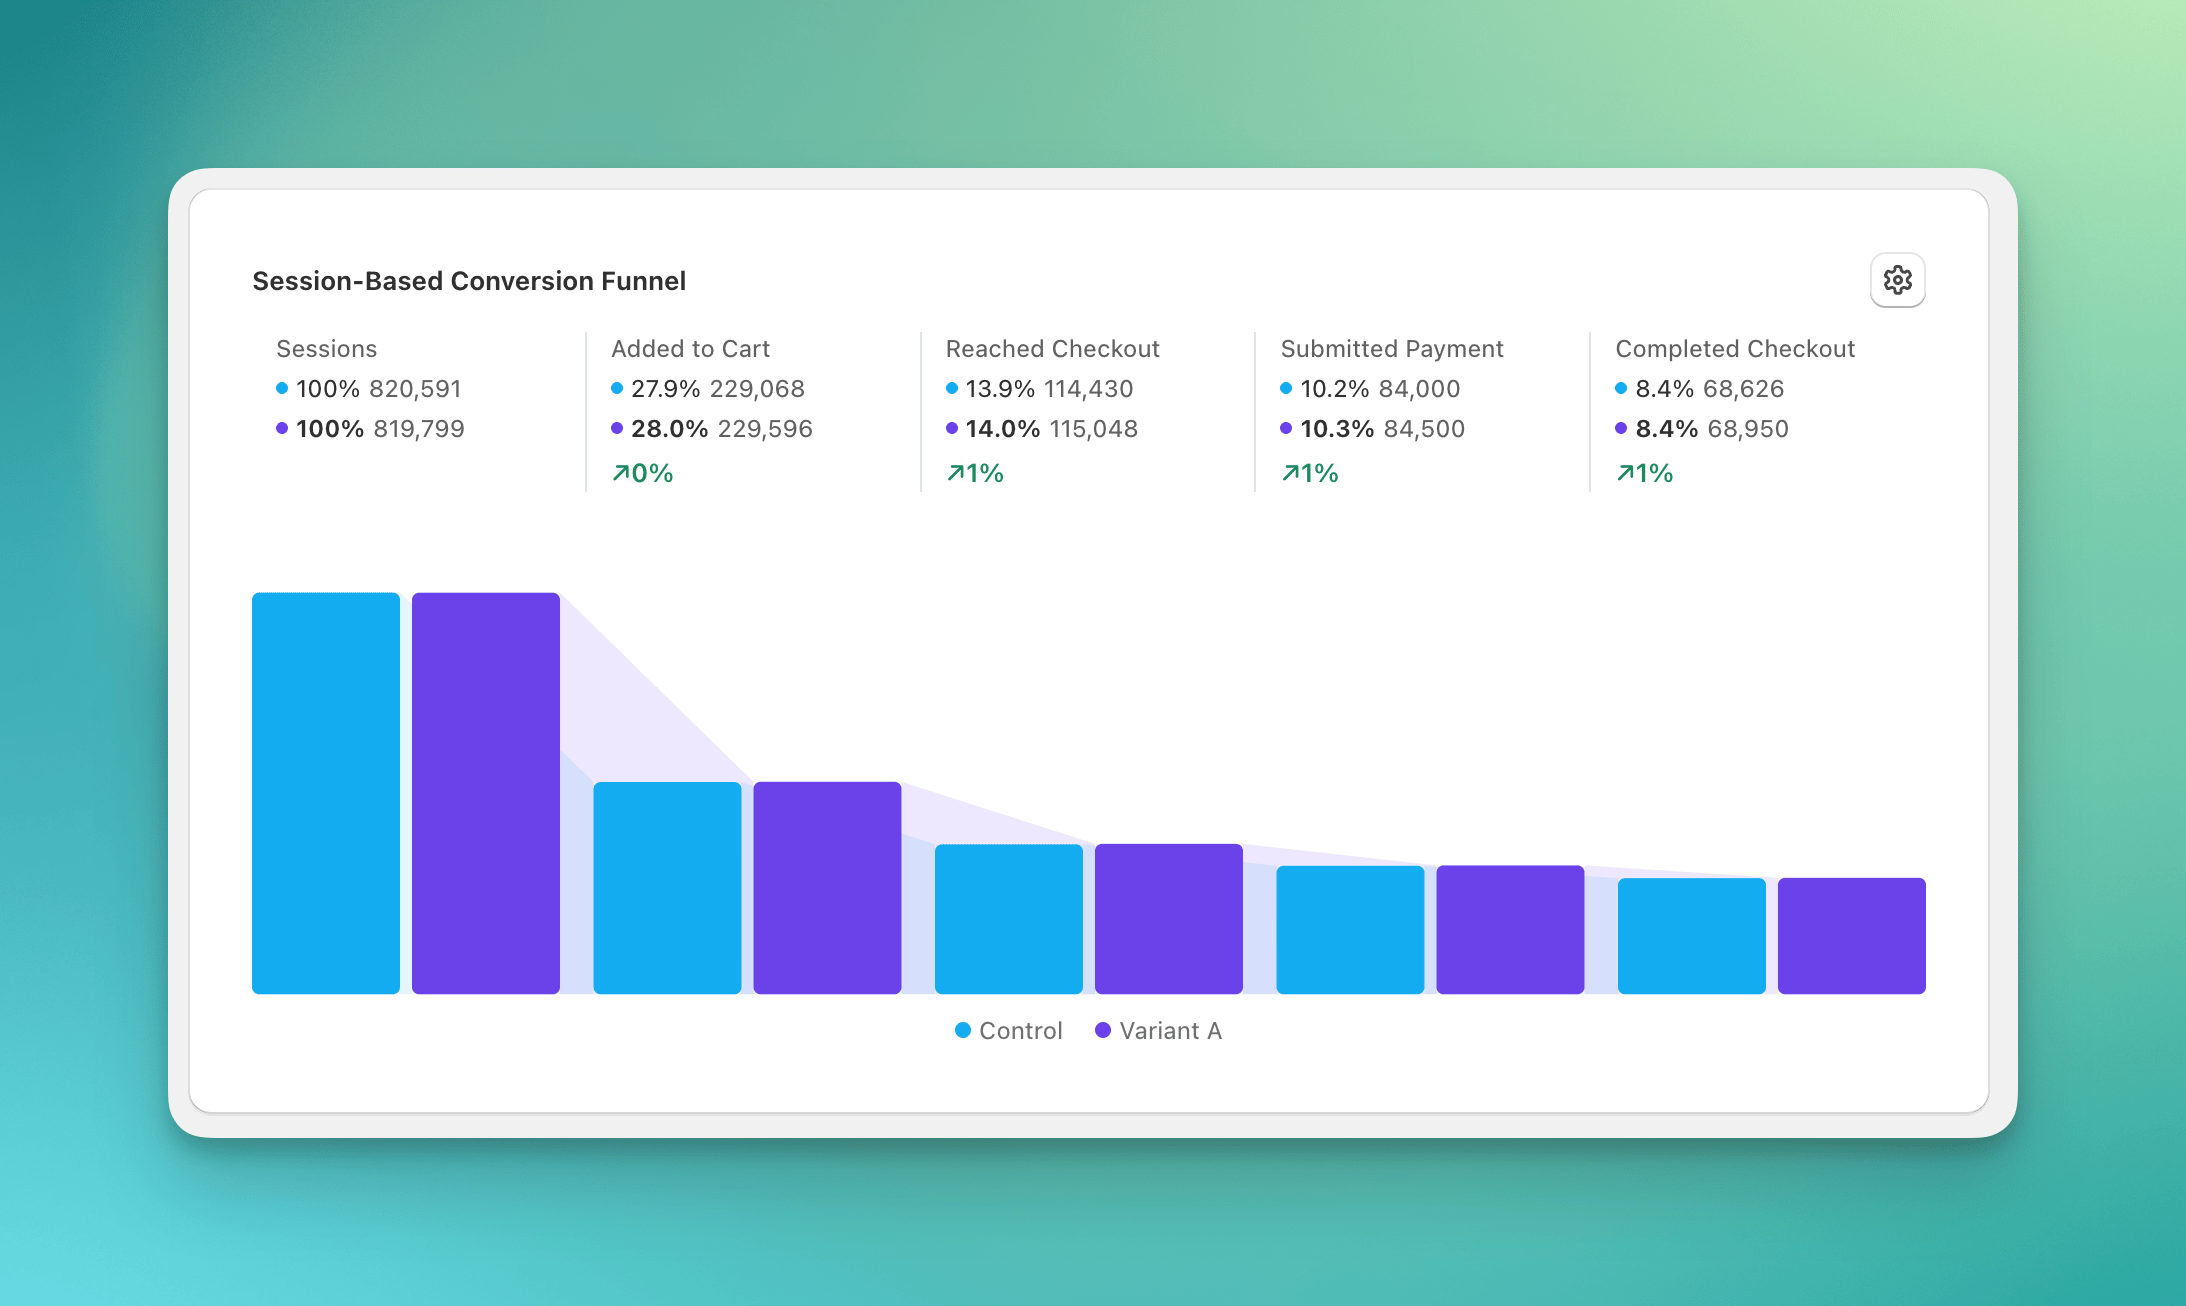
Open the Analytics dashboard to compare Control against each variant. ABConvert tracks the checkout funnel step by step, so you can see where each variant drops off. You can also add custom funnel steps to measure stages specific to your checkout.
The session-based conversion funnel.
Metric
What it tells you
Conversion rate
Share of visitors who complete the order. The primary signal for most checkout tests.
Order count
Completed orders credited to each variant.
Revenue
Total revenue from each variant’s completed orders.
Average order value
Revenue divided by order count, useful for upsell or shipping tests.
For full definitions and how significance is calculated, see Metrics.
Checkout tests often reach significance faster than storefront tests, because only high-intent visitors who reach checkout are counted.
Almost always because the blocks weren’t added in the checkout editor, or a Block ID was pasted into the wrong placement. Follow Add your blocks: add a Checkout Block at each placement, paste the matching Block ID, and add the Cart Control block in Order summary if you use Cart changes.
A block shows 'Block hidden in this variant'. Is that a problem?
No. It means the selected variant has no change for that block, so customers in it won’t see the block. Switch the dropdown to another variant to confirm it renders there.
Will my preview sessions affect my results?
No. Preview sessions bypass traffic allocation and audience targeting and are excluded from analytics.
Do visitors keep the same variant when they come back?
Yes. Once assigned, a visitor sees the same checkout for the duration of the test.
⌘I
Assistant
Responses are generated using AI and may contain mistakes.