> ## Documentation Index
> Fetch the complete documentation index at: https://docs.abconvert.io/llms.txt
> Use this file to discover all available pages before exploring further.
# Troubleshooting Common ABConvert Issues
> Step-by-step guides for the most common problems when running and analyzing your experiments
## Analytics showing 0 views or conversions
Your experiment is running but the analytics dashboard shows no data, or data stopped recording partway through.
Go to your analytics page and select the **Test Settings** tab. In the **Test Details** section, look for a green healthy label indicating the test is running properly.
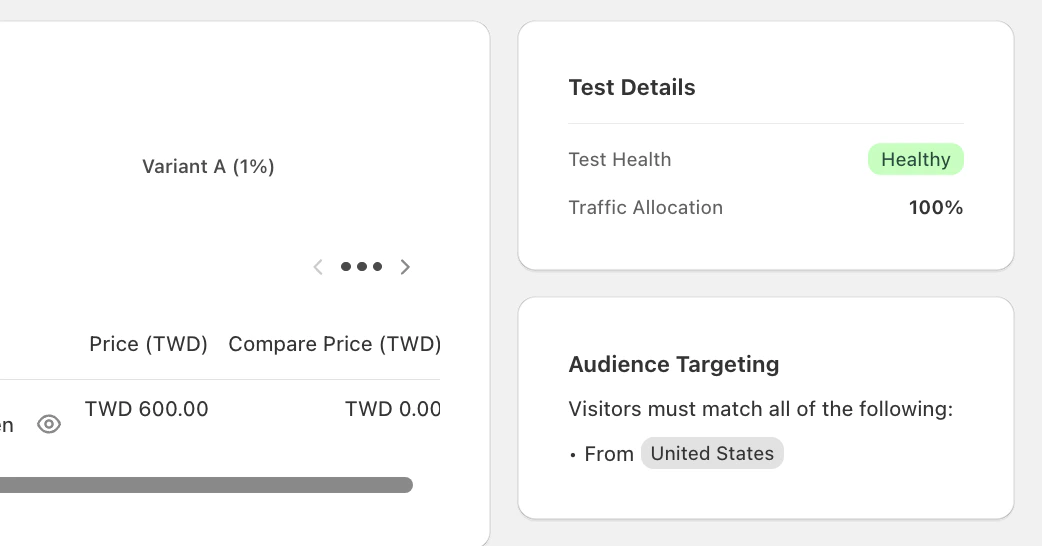 Analytics data processes with a delay. Our system caches data to maintain fast dashboard performance, so new events can take up to 10–15 minutes to appear. If you just launched your experiment, wait at least 1–2 hours for meaningful traffic before checking results.
Analytics only populate when real visitors interact with your experiment. Confirm that:
* Your store is receiving traffic to the experiment page
* Your audience targeting rules are configured correctly
Open your store in an incognito or private window to bypass Shopify's cache. Trigger a page view or add an item to your cart, then click **Refresh** on your dashboard to see updated data.
***
## Test variant not showing on live store
The active test variant is failing to display for visitors on the live storefront.
Go to your analytics page and select the **Test Settings** tab. In the **Test Details** section, look for a green healthy label indicating the test is running properly.
With a 50/50 traffic split, you may randomly see the original page. Instead of guessing, use the preview links in your ABConvert dashboard's **Test Settings** tab. These links bypass the traffic split and force the variant to load, letting you confirm it's working.
Once you visit your store, our system assigns you to a variant and keeps showing you that version. To properly QA your test, always use a fresh incognito window so previous assignments don't interfere.
Use **Preview Mode** before going live
We recommend testing your variant in preview mode before launching the test live. This ensures everything works as expected without affecting real traffic.
Analytics data processes with a delay. Our system caches data to maintain fast dashboard performance, so new events can take up to 10–15 minutes to appear. If you just launched your experiment, wait at least 1–2 hours for meaningful traffic before checking results.
Analytics only populate when real visitors interact with your experiment. Confirm that:
* Your store is receiving traffic to the experiment page
* Your audience targeting rules are configured correctly
Open your store in an incognito or private window to bypass Shopify's cache. Trigger a page view or add an item to your cart, then click **Refresh** on your dashboard to see updated data.
***
## Test variant not showing on live store
The active test variant is failing to display for visitors on the live storefront.
Go to your analytics page and select the **Test Settings** tab. In the **Test Details** section, look for a green healthy label indicating the test is running properly.
With a 50/50 traffic split, you may randomly see the original page. Instead of guessing, use the preview links in your ABConvert dashboard's **Test Settings** tab. These links bypass the traffic split and force the variant to load, letting you confirm it's working.
Once you visit your store, our system assigns you to a variant and keeps showing you that version. To properly QA your test, always use a fresh incognito window so previous assignments don't interfere.
Use **Preview Mode** before going live
We recommend testing your variant in preview mode before launching the test live. This ensures everything works as expected without affecting real traffic.
 ***
## Price not updating correctly in the store
Visitors are seeing the original price instead of the test price, or prices are displaying incorrectly across different pages or after adding items to the cart.
Go to your analytics page and select the **Test Settings** tab. In the **Test Details** section, look for a green healthy label indicating the test is running properly.
Open the experiment and verify that the product you're testing is listed under the experiment's products. If it isn't, the script won't update prices on that product's page.
When you first start a price test, our team reviews your theme to ensure compatibility with our price tests. If you've recently updated your theme, this may prevent prices from updating correctly. Contact support to request a new theme review.
***
## Shipping rates are not showing correctly in checkout
Visitors are seeing the original shipping rates instead of the expected test rates, or shipping costs are displaying incorrectly during the checkout process.
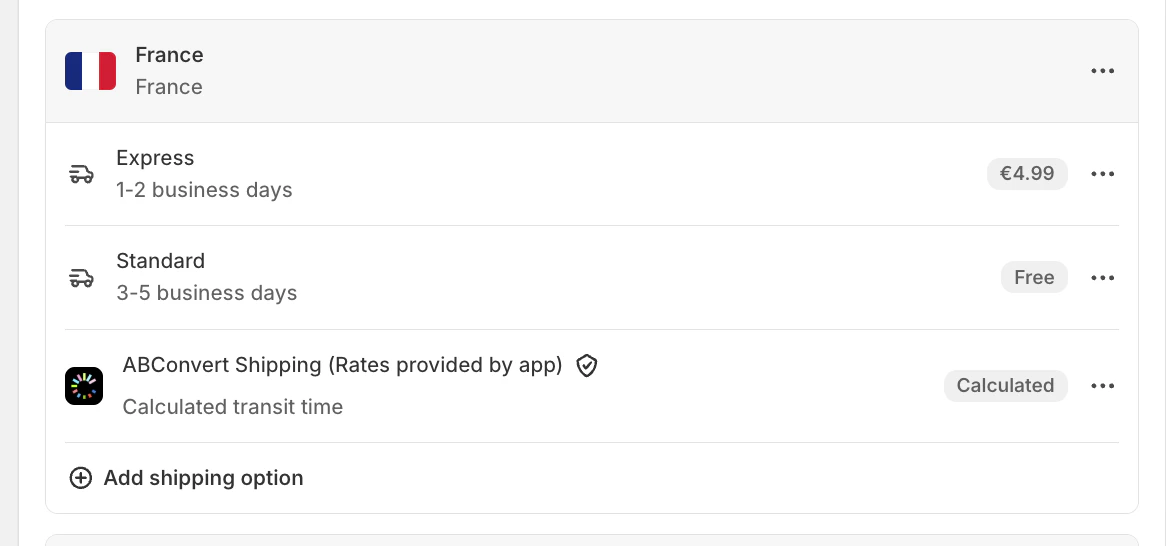
To enable shipping tests, add ABConvert shipping rates to your target zones.
1. Go to **Shipping and delivery settings** > **General profile**
2. Select your zone, click **Add shipping option**
3. Choose **Carrier or app calculated**, select **ABConvert**, and click **Done**.
***
## Price not updating correctly in the store
Visitors are seeing the original price instead of the test price, or prices are displaying incorrectly across different pages or after adding items to the cart.
Go to your analytics page and select the **Test Settings** tab. In the **Test Details** section, look for a green healthy label indicating the test is running properly.
Open the experiment and verify that the product you're testing is listed under the experiment's products. If it isn't, the script won't update prices on that product's page.
When you first start a price test, our team reviews your theme to ensure compatibility with our price tests. If you've recently updated your theme, this may prevent prices from updating correctly. Contact support to request a new theme review.
***
## Shipping rates are not showing correctly in checkout
Visitors are seeing the original shipping rates instead of the expected test rates, or shipping costs are displaying incorrectly during the checkout process.
To enable shipping tests, add ABConvert shipping rates to your target zones.
1. Go to **Shipping and delivery settings** > **General profile**
2. Select your zone, click **Add shipping option**
3. Choose **Carrier or app calculated**, select **ABConvert**, and click **Done**.
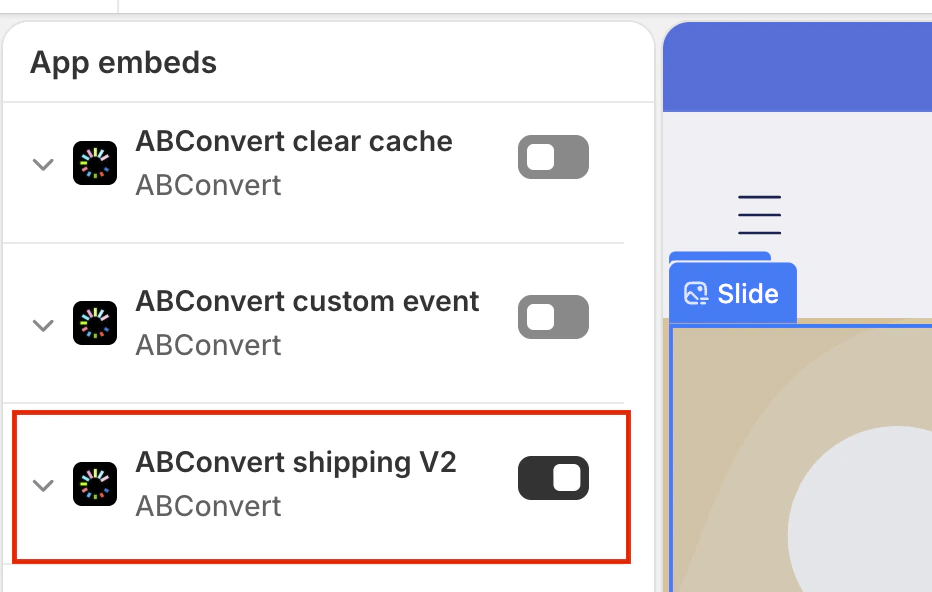
 Verify the **ABConvert Shipping V2** app embed is enabled in your live theme before running shipping tests. This embed is required for the shipping script to calculate and display test rates correctly.
 Shipping tests are zone-aware and only display test rates for visitors in your targeted shipping zone. If you're testing from a different location, use a VPN to match your target zone during QA to see accurate test rates.
If shipping rates calculate incorrectly when **discount codes are applied at checkout**, it's because our script cannot run on Shopify's checkout page due to platform limitations. Manually entered discount codes won't be recognized by our shipping script.
Shipping tests are zone-aware and only display test rates for visitors in your targeted shipping zone. If you're testing from a different location, use a VPN to match your target zone during QA to see accurate test rates.
If shipping rates calculate incorrectly when **discount codes are applied at checkout**, it's because our script cannot run on Shopify's checkout page due to platform limitations. Manually entered discount codes won't be recognized by our shipping script.
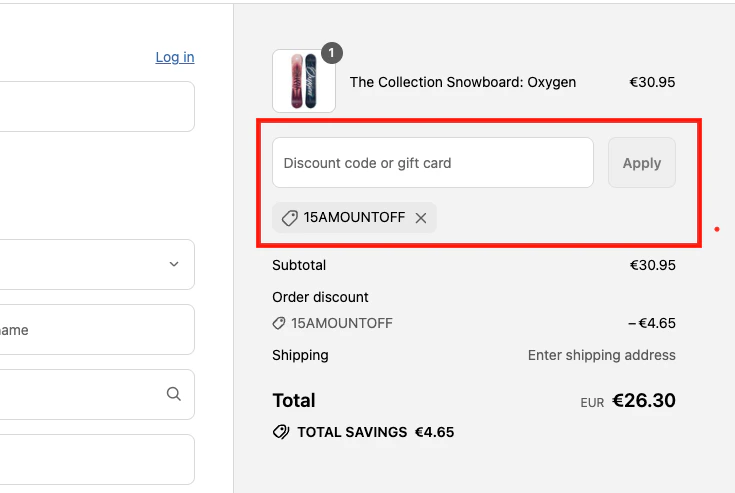 To fix this, **apply discounts automatically before checkout** using Shopify's automatic discount settings. This ensures the shipping script calculates rates correctly with discounts included.
If you work through the steps above and still can't resolve the issue, contact support based on your plan:
* **Starter plan** — self-serve documentation
* **Growth plan** — email support (response within 24–48 hours)
* **Scale plan** — priority email + live chat (response within 12–24 hours)
* **Pro and Unlimited plans** — dedicated Slack channel and scheduled calls
To fix this, **apply discounts automatically before checkout** using Shopify's automatic discount settings. This ensures the shipping script calculates rates correctly with discounts included.
If you work through the steps above and still can't resolve the issue, contact support based on your plan:
* **Starter plan** — self-serve documentation
* **Growth plan** — email support (response within 24–48 hours)
* **Scale plan** — priority email + live chat (response within 12–24 hours)
* **Pro and Unlimited plans** — dedicated Slack channel and scheduled calls