> ## Documentation Index
> Fetch the complete documentation index at: https://docs.abconvert.io/llms.txt
> Use this file to discover all available pages before exploring further.
# Visual Editor Test: Getting Started
> A/B test storefront content like headlines, images, and buttons to improve conversion rate without touching theme code.
## What is a visual editor test?
A visual editor test allows you to create A/B tests directly on your Shopify storefront without touching theme code. Using the built-in visual editor, you can modify text, images, buttons, links, and page elements for different visitor groups.
This helps you validate design and messaging changes before permanently updating your store. Visual editor tests are ideal for testing conversion-focused improvements quickly while keeping your original theme intact.
## Visual editor test use cases
* **Test homepage headlines:** Compare different messaging to improve conversion rate.
* **Experiment with CTA buttons:** Test button text, links, or placement.
* **Validate product page layouts:** Hide or reorder sections to improve engagement.
* **Test promotional banners or images:** Compare creative assets during campaigns or seasonal promotions.
## Set up a visual editor test
In the ABConvert dashboard, click **Create New Test** and select **Visual Editor Test**.
Enter a descriptive name for your experiment, write a clear hypothesis, and select your primary success metric. By default, traffic is split evenly between the Control and Variant groups. You can adjust the traffic allocation or add additional variants.
Define which visitors should enter the experiment using audience targeting and traffic allocation rules. Read more in the [Audience targeting](/experiments/audience-targeting) guide.
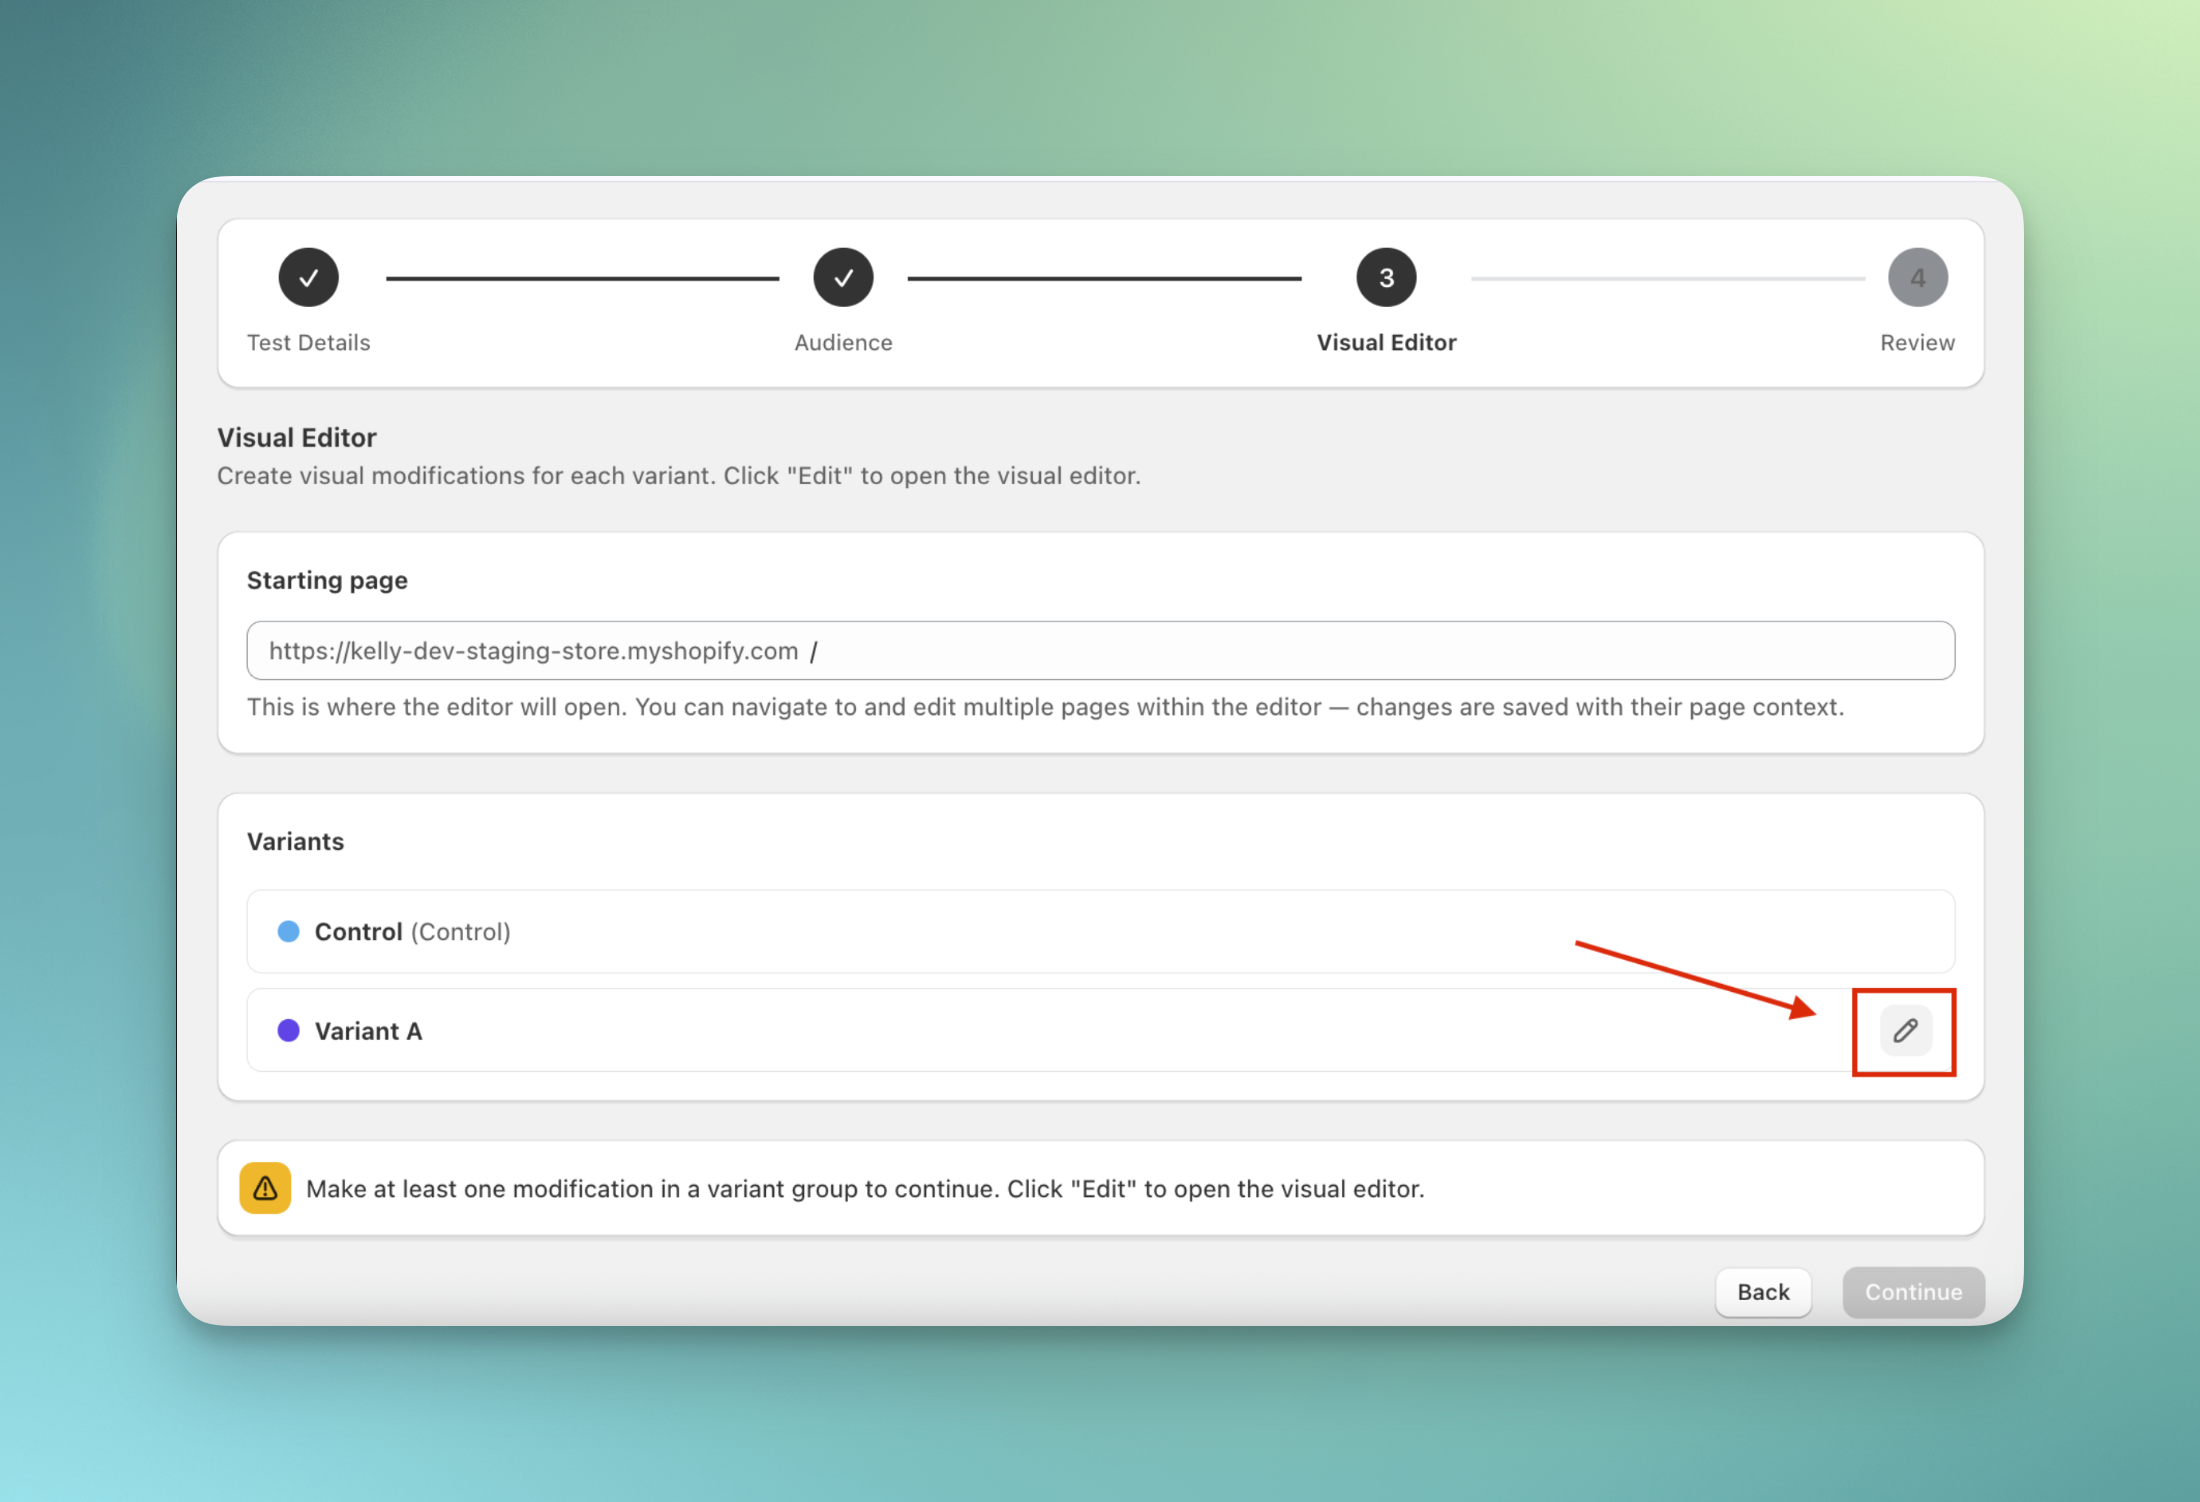
In Step 3 of the setup wizard, click the **Edit** button with the pencil icon to open the visual editor.
 Update your variant in the visual editor, see the section Using the visual editor for more detailed guide.
Review your full experiment configuration, including the visitor flow and visual changes. We recommend using **Preview test** to check your changes on the storefront before launching. When everything looks correct, click **Launch test**.
## Using the visual editor
### The top bar
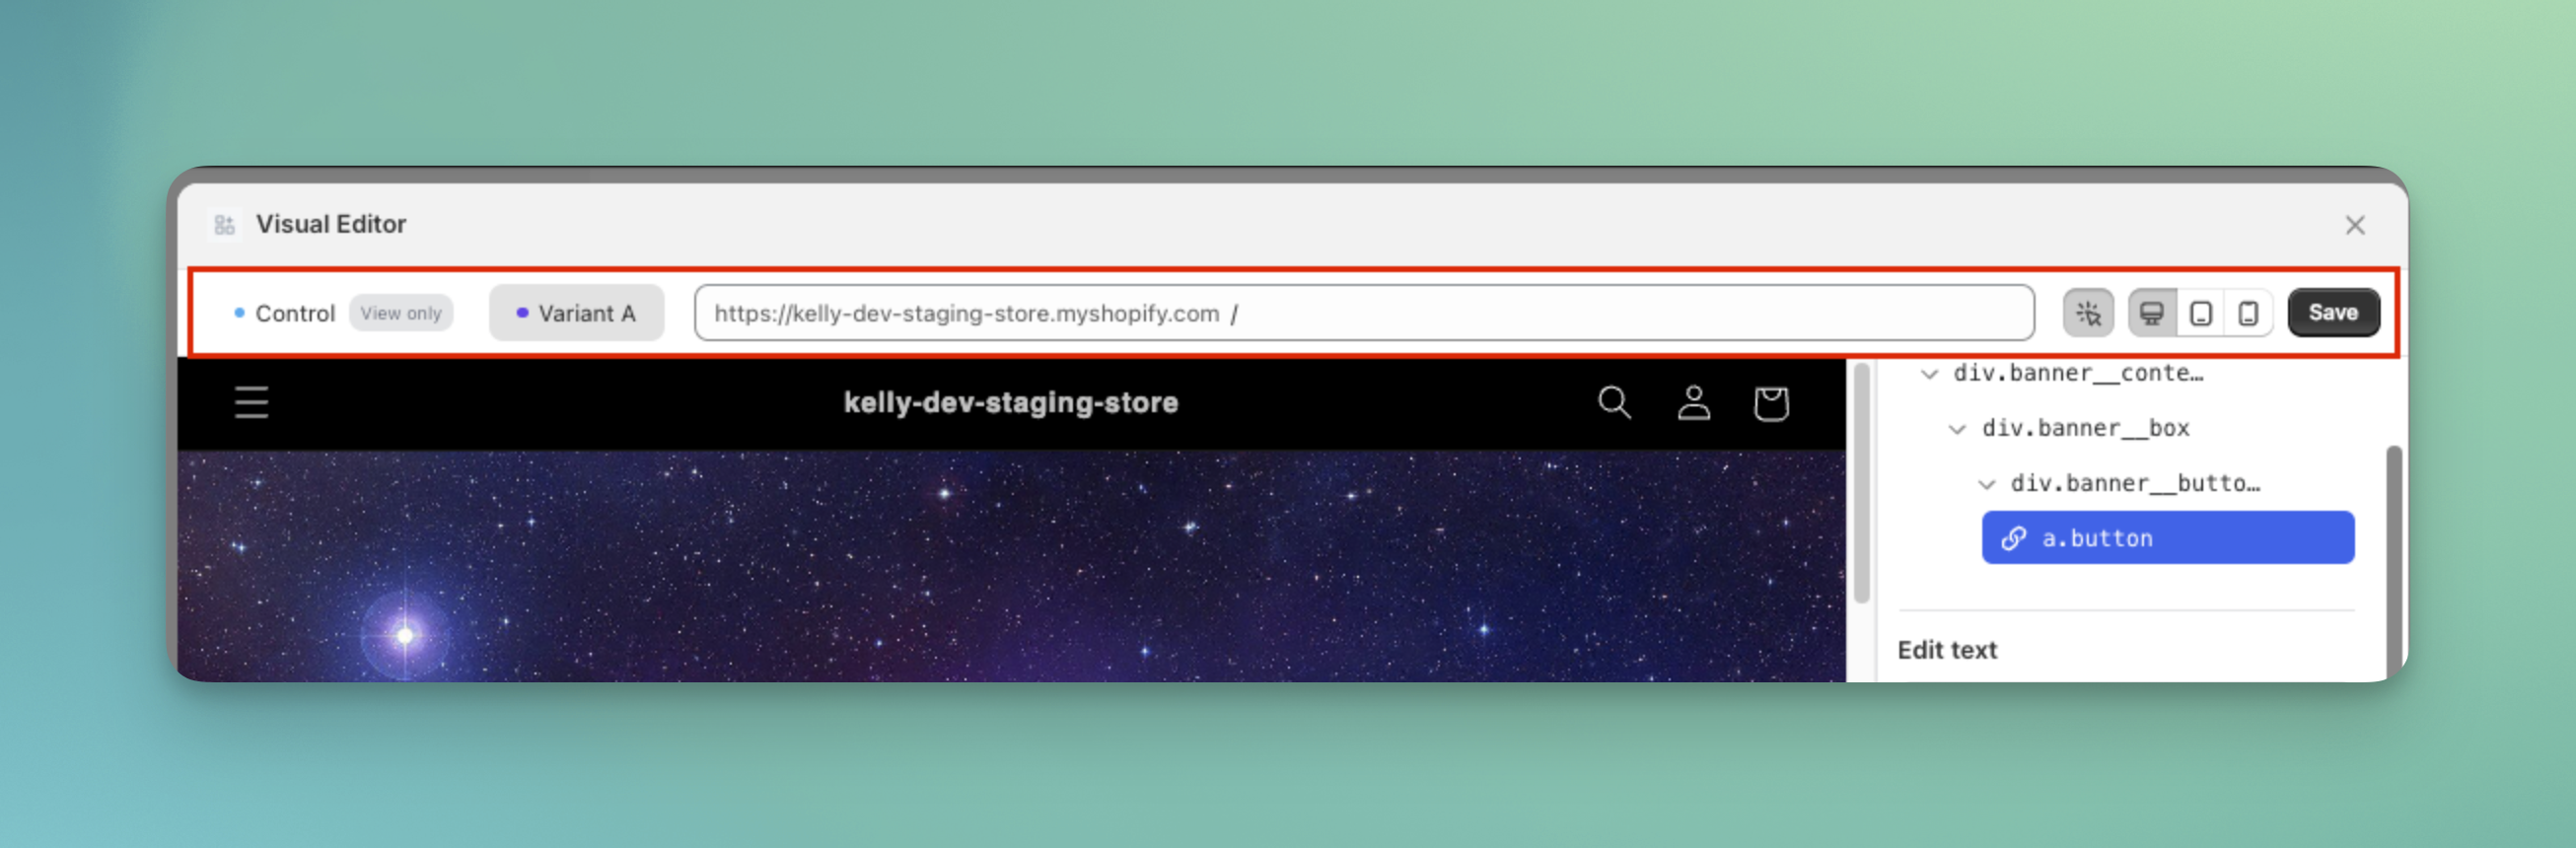
At the top of the editor, you will see several controls. From left to right:
1. **Variant switcher:** Switch between the **Control** and different variant groups
2. **URL bar:** Type a URL to navigate to another page within your store
3. **Select element button:** Turn this on to activate **Select mode**
* When enabled, you can click elements and edit them
* When disabled, you can browse your store normally
4. **Device switcher:** Preview your store on desktop, tablet, or mobile screen sizes
5. **Save button:** Click **Save** to keep your changes
Update your variant in the visual editor, see the section Using the visual editor for more detailed guide.
Review your full experiment configuration, including the visitor flow and visual changes. We recommend using **Preview test** to check your changes on the storefront before launching. When everything looks correct, click **Launch test**.
## Using the visual editor
### The top bar
At the top of the editor, you will see several controls. From left to right:
1. **Variant switcher:** Switch between the **Control** and different variant groups
2. **URL bar:** Type a URL to navigate to another page within your store
3. **Select element button:** Turn this on to activate **Select mode**
* When enabled, you can click elements and edit them
* When disabled, you can browse your store normally
4. **Device switcher:** Preview your store on desktop, tablet, or mobile screen sizes
5. **Save button:** Click **Save** to keep your changes
 ### Edit elements in select mode
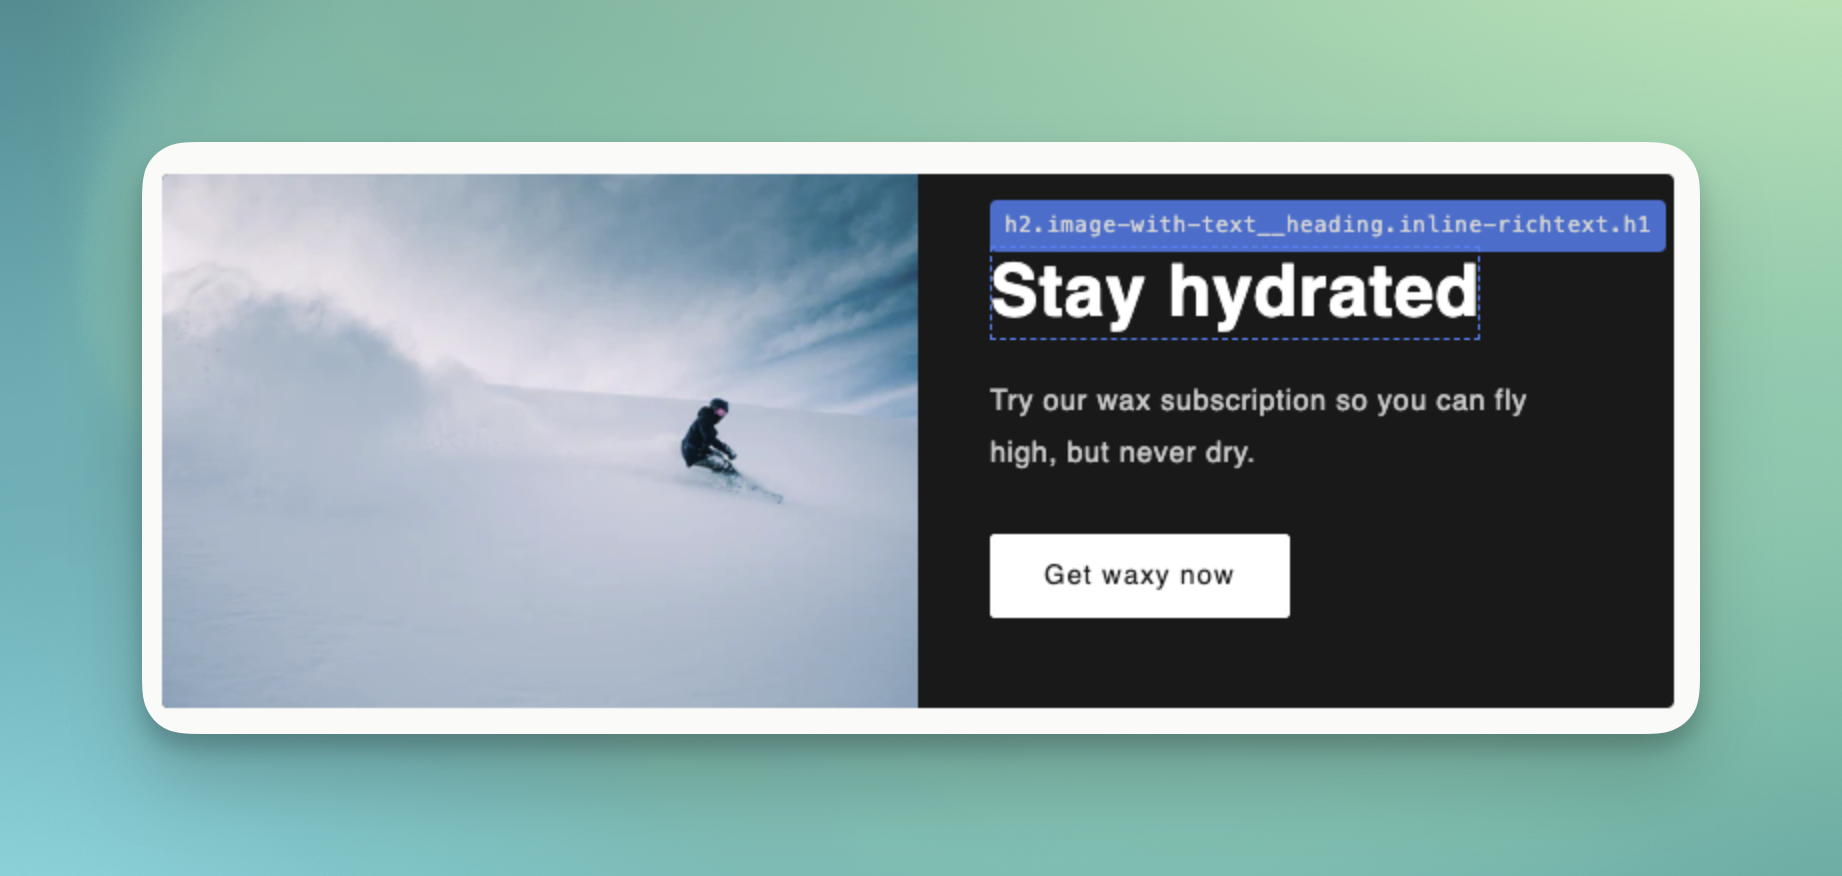
When **Select mode** is active:
* Move your cursor over the page
* Elements will be outlined as you hover
* Click an element to select it
### Edit elements in select mode
When **Select mode** is active:
* Move your cursor over the page
* Elements will be outlined as you hover
* Click an element to select it
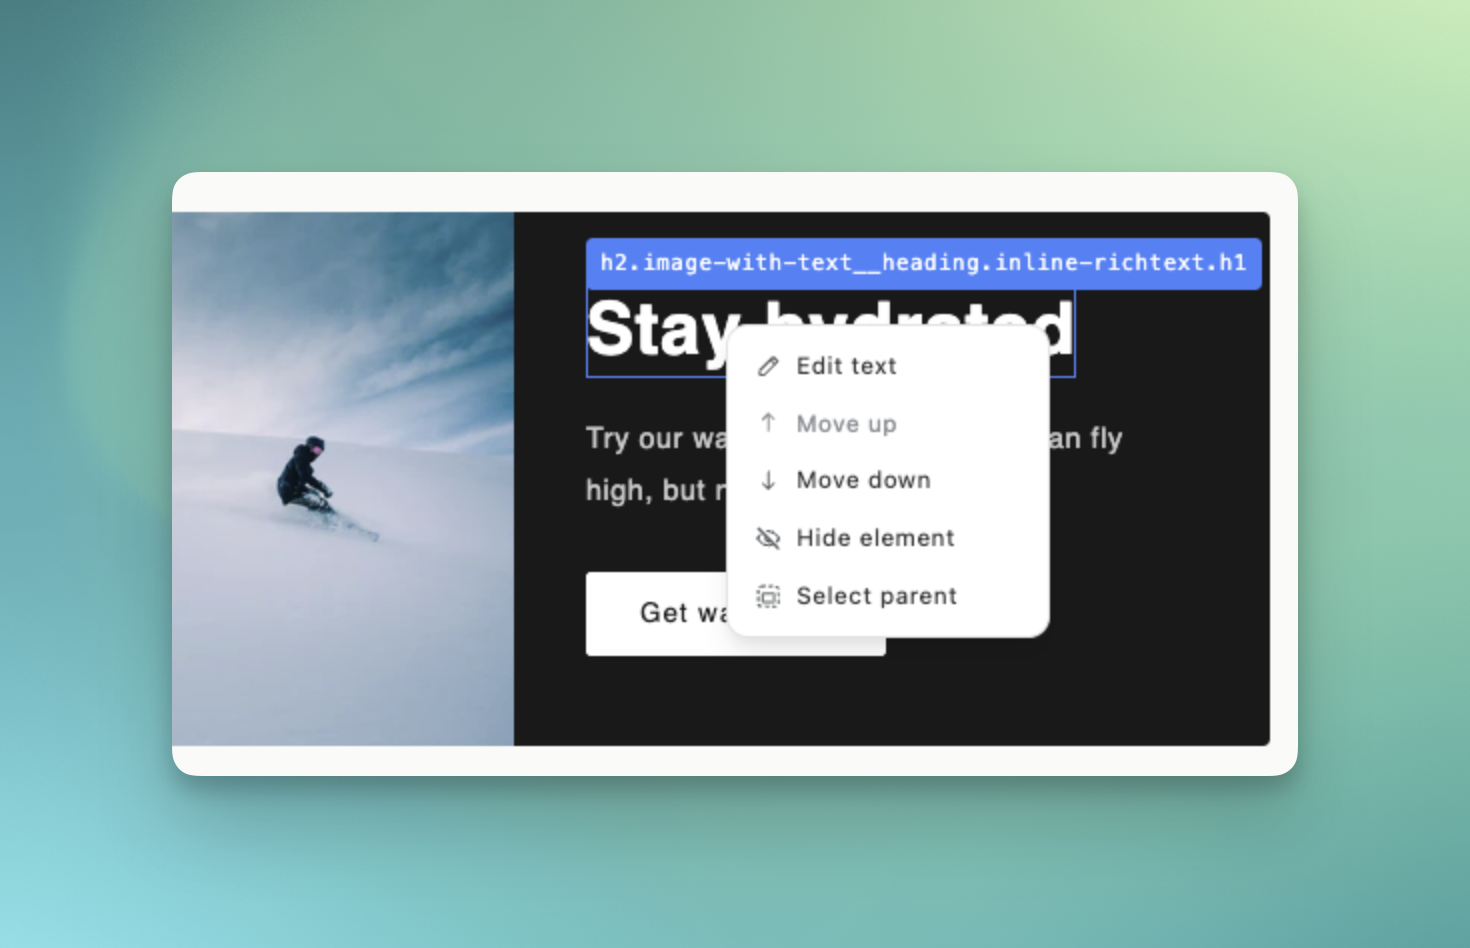
 After selecting an element, **right-click** to see editing options:
* **Edit**: Depending on the element type, you can:
* Edit text: Update the text in the input field, then click Save
* Change link: Enter a new URL for buttons or linked text
* Change image: Choose an image from your library, upload a new one, or paste an image URL
* **Move up** or **move down**
* Reorder the element within the same hierarchy level
* For example, move a product card to the first position in a grid
Note: You can only reorder elements within the same parent container
* **Hide element**
* Hide the selected element from the page without deleting it in Shopify
* **Select parent**
* Quickly jump to the parent container if you need to edit a larger section
After selecting an element, **right-click** to see editing options:
* **Edit**: Depending on the element type, you can:
* Edit text: Update the text in the input field, then click Save
* Change link: Enter a new URL for buttons or linked text
* Change image: Choose an image from your library, upload a new one, or paste an image URL
* **Move up** or **move down**
* Reorder the element within the same hierarchy level
* For example, move a product card to the first position in a grid
Note: You can only reorder elements within the same parent container
* **Hide element**
* Hide the selected element from the page without deleting it in Shopify
* **Select parent**
* Quickly jump to the parent container if you need to edit a larger section
 ### The right-side panel
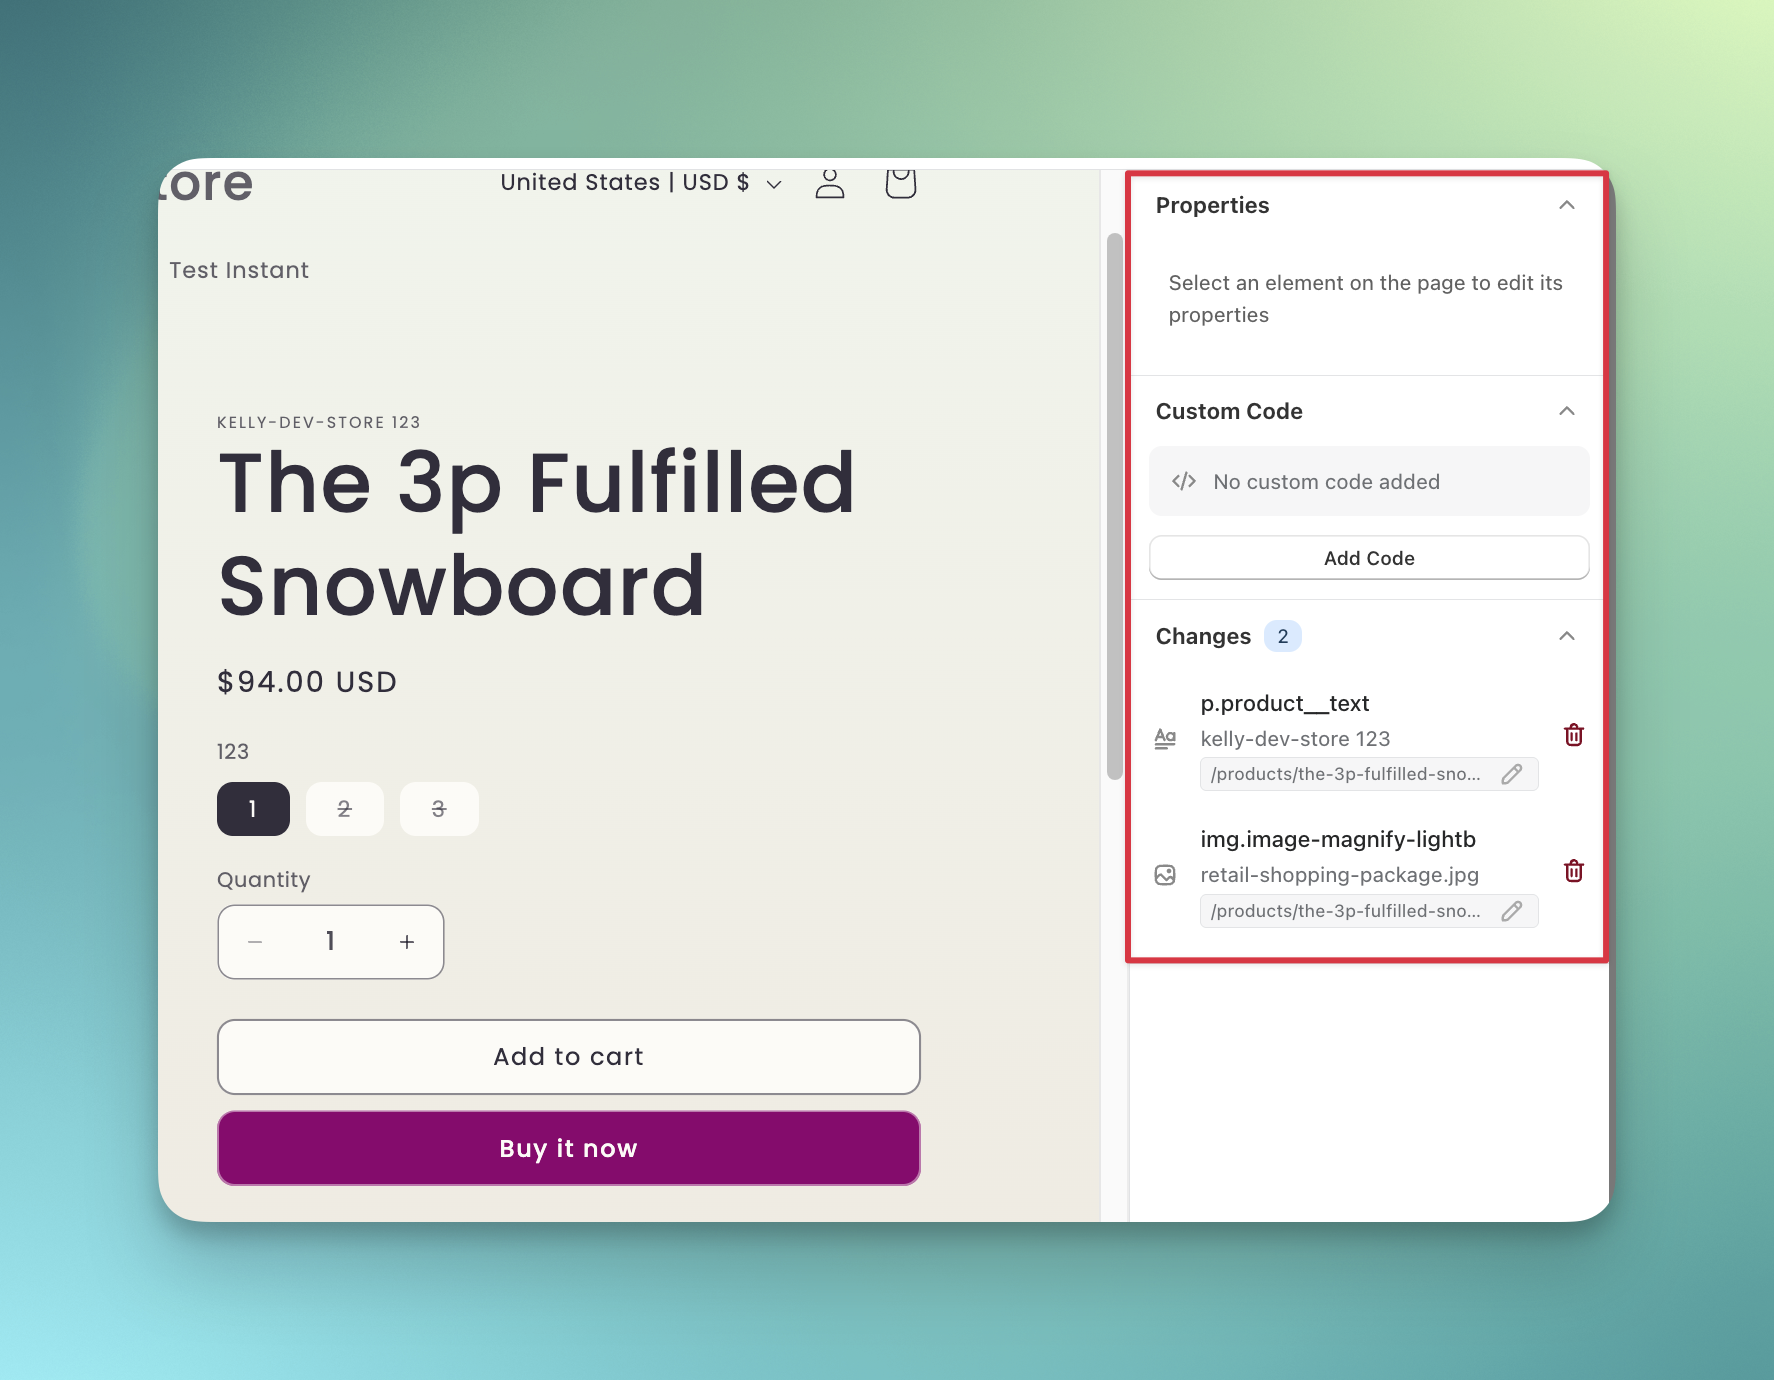
When an element is selected, the right panel gives you more controls.
* **Properties**:
* View the element tree structure
* Note: You can see up to three levels above the selected element
* **Edit options**: You will see the same editing options here, this is useful if you prefer using the side panel instead of right-clicking
* Edit text
* Change link
* Change image
* **Custom code**
* Click **Add code** to insert custom **CSS** or **JavaScript**
* This applies at the **site level,** not just one page. Use this for advanced customizations
* **Changes**
* This section shows all edits made in each variant group
* Click the **trash icon** to remove a specific change
### The right-side panel
When an element is selected, the right panel gives you more controls.
* **Properties**:
* View the element tree structure
* Note: You can see up to three levels above the selected element
* **Edit options**: You will see the same editing options here, this is useful if you prefer using the side panel instead of right-clicking
* Edit text
* Change link
* Change image
* **Custom code**
* Click **Add code** to insert custom **CSS** or **JavaScript**
* This applies at the **site level,** not just one page. Use this for advanced customizations
* **Changes**
* This section shows all edits made in each variant group
* Click the **trash icon** to remove a specific change
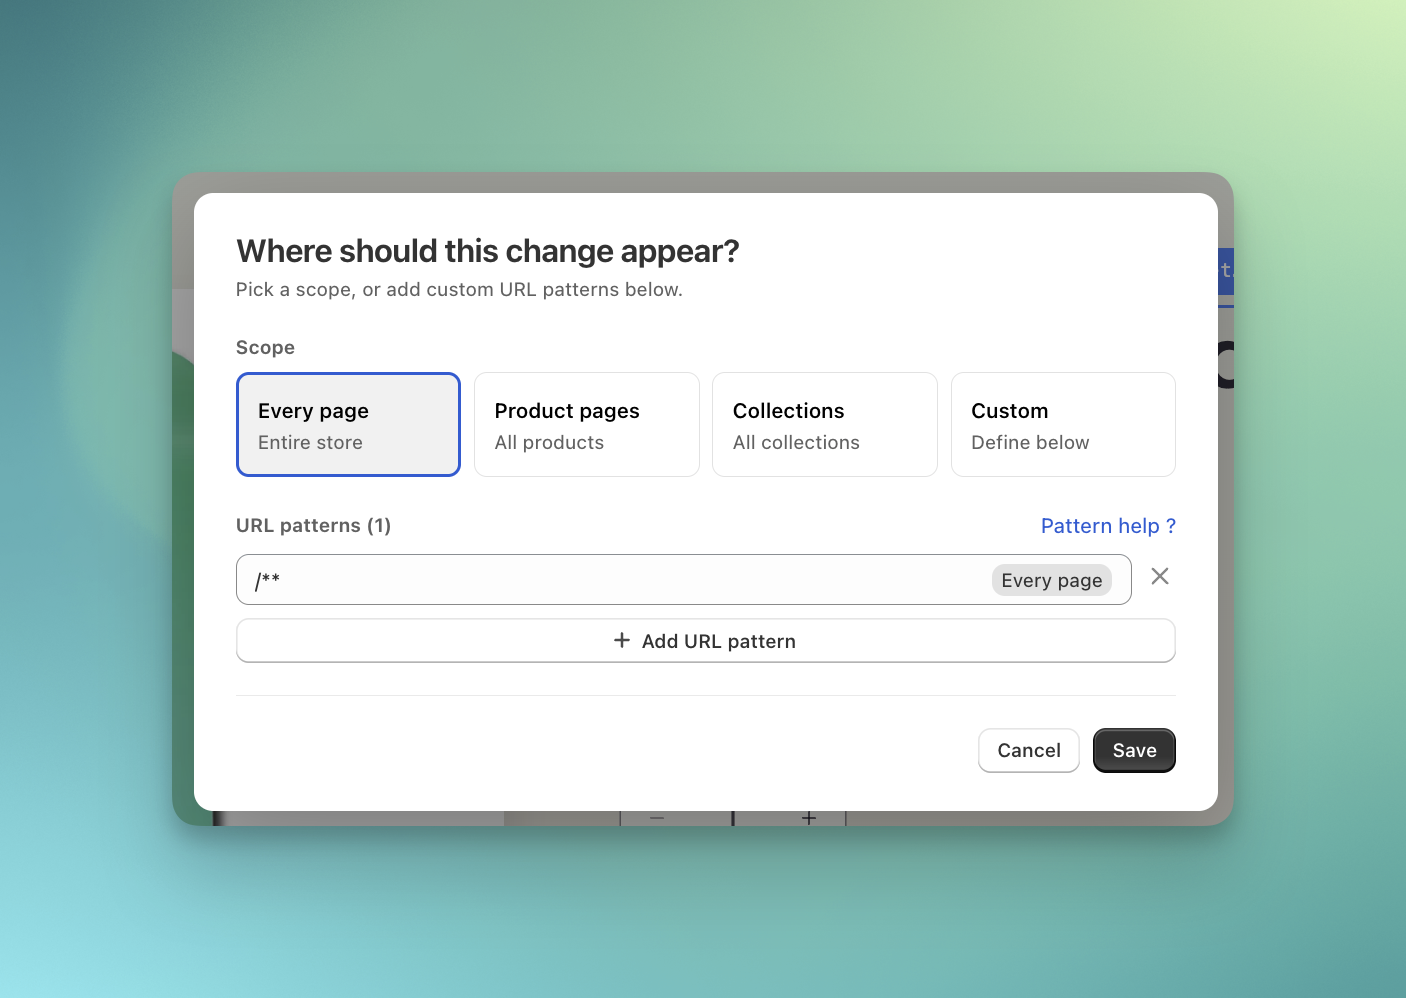
 For each change, you can click the **edit icon** to get more control over where the change appears in your store.
 ## Visual editor test FAQs
No. The visual editor is designed for non-technical Shopify merchants. Most changes can be made directly through the editor interface without touching code.
Yes. You can preview your storefront on desktop, tablet, and mobile devices while building your experiment.
No. Your original Shopify theme files remain unchanged.
Yes. You can add custom CSS or JavaScript using the Custom code section in the right-side panel.
Yes. The Changes panel shows all edits made in the current variant. You can remove individual changes at any time before launch.
The visual editor works with most standard Shopify themes. However, there are a few things to keep in mind:
* **Dynamically rendered elements** (e.g., content loaded via JavaScript after page load) may not be selectable or editable.
* **Third-party app elements** may have limited editability depending on how they are rendered.
## Visual editor test FAQs
No. The visual editor is designed for non-technical Shopify merchants. Most changes can be made directly through the editor interface without touching code.
Yes. You can preview your storefront on desktop, tablet, and mobile devices while building your experiment.
No. Your original Shopify theme files remain unchanged.
Yes. You can add custom CSS or JavaScript using the Custom code section in the right-side panel.
Yes. The Changes panel shows all edits made in the current variant. You can remove individual changes at any time before launch.
The visual editor works with most standard Shopify themes. However, there are a few things to keep in mind:
* **Dynamically rendered elements** (e.g., content loaded via JavaScript after page load) may not be selectable or editable.
* **Third-party app elements** may have limited editability depending on how they are rendered.