> ## Documentation Index
> Fetch the complete documentation index at: https://docs.abconvert.io/llms.txt
> Use this file to discover all available pages before exploring further.

# Checkout test

> A/B test changes to your Shopify checkout to see what lifts orders and revenue.

A checkout test splits your visitors into groups, shows each group a different checkout, and measures which completes more orders. You decide what every group sees, and ABConvert compares the results.

<Note>
  Checkout tests are available on all ABConvert plans. Delivery and Payment modifications work on any Shopify plan. Content, Cart, and Upsell modifications require **Shopify Plus**.
</Note>

## When to use it

Use a checkout test to prove a change lifts orders or revenue before rolling it out:

* **Raise order value with an upsell.** Show a product recommendation inside checkout and compare average order value against Control.
* **Win more orders with reassurance.** Add trust badges, a guarantee banner, or payment icons, and measure whether more visitors finish.
* **Guide shipping choice.** Rename or reorder shipping options to make a faster option clearer.
* **Streamline payment methods.** Hide, rename, or reorder payment methods and measure the effect on completed checkouts.

## When NOT to use it

Checkout tests change only what visitors see *at checkout*. If your change happens earlier, use the test built for that surface:

* **Testing a product's price?** Use a [price test](/experiments/price-test). Checkout tests don't change the price shoppers pay.
* **Testing a discount or promotion?** Use an [offer test](/experiments/offer-test). A checkout test can rename a payment method but can't discount it.
* **Testing a landing or product page?** Use a [URL redirect test](/experiments/url-redirect-test) or [theme test](/experiments/theme-test). Checkout tests don't touch the pages leading up to checkout.

## What you can change

A checkout test can modify five things. Combine several in one variant, and give each variant its own set.

| Category     | What it changes                                                                              |
| ------------ | -------------------------------------------------------------------------------------------- |
| **Delivery** | Which shipping options shoppers see at checkout and how they're labeled.                     |
| **Payment**  | Which payment methods shoppers see and how they're labeled.                                  |
| **Content**  | Adds visual blocks (banners, trust badges, benefits, images) that build confidence.          |
| **Cart**     | Whether shoppers can edit cart lines at checkout: change variant, quantity, or remove items. |
| **Upsell**   | Recommends extra products at checkout so shoppers add them without leaving the page.         |

## Set up a checkout test

<Steps>
  <Step title="Add basic information">
    Choose the **Checkout** type, name the test, set a hypothesis, pick your primary metric, and add the variants to test against Control.
  </Step>

  <Step title="Configure your audience">
    Set the traffic split and targeting rules. See [Audience targeting](/experiments/audience-targeting).
  </Step>

  <Step title="Add modifications and preview as you build">
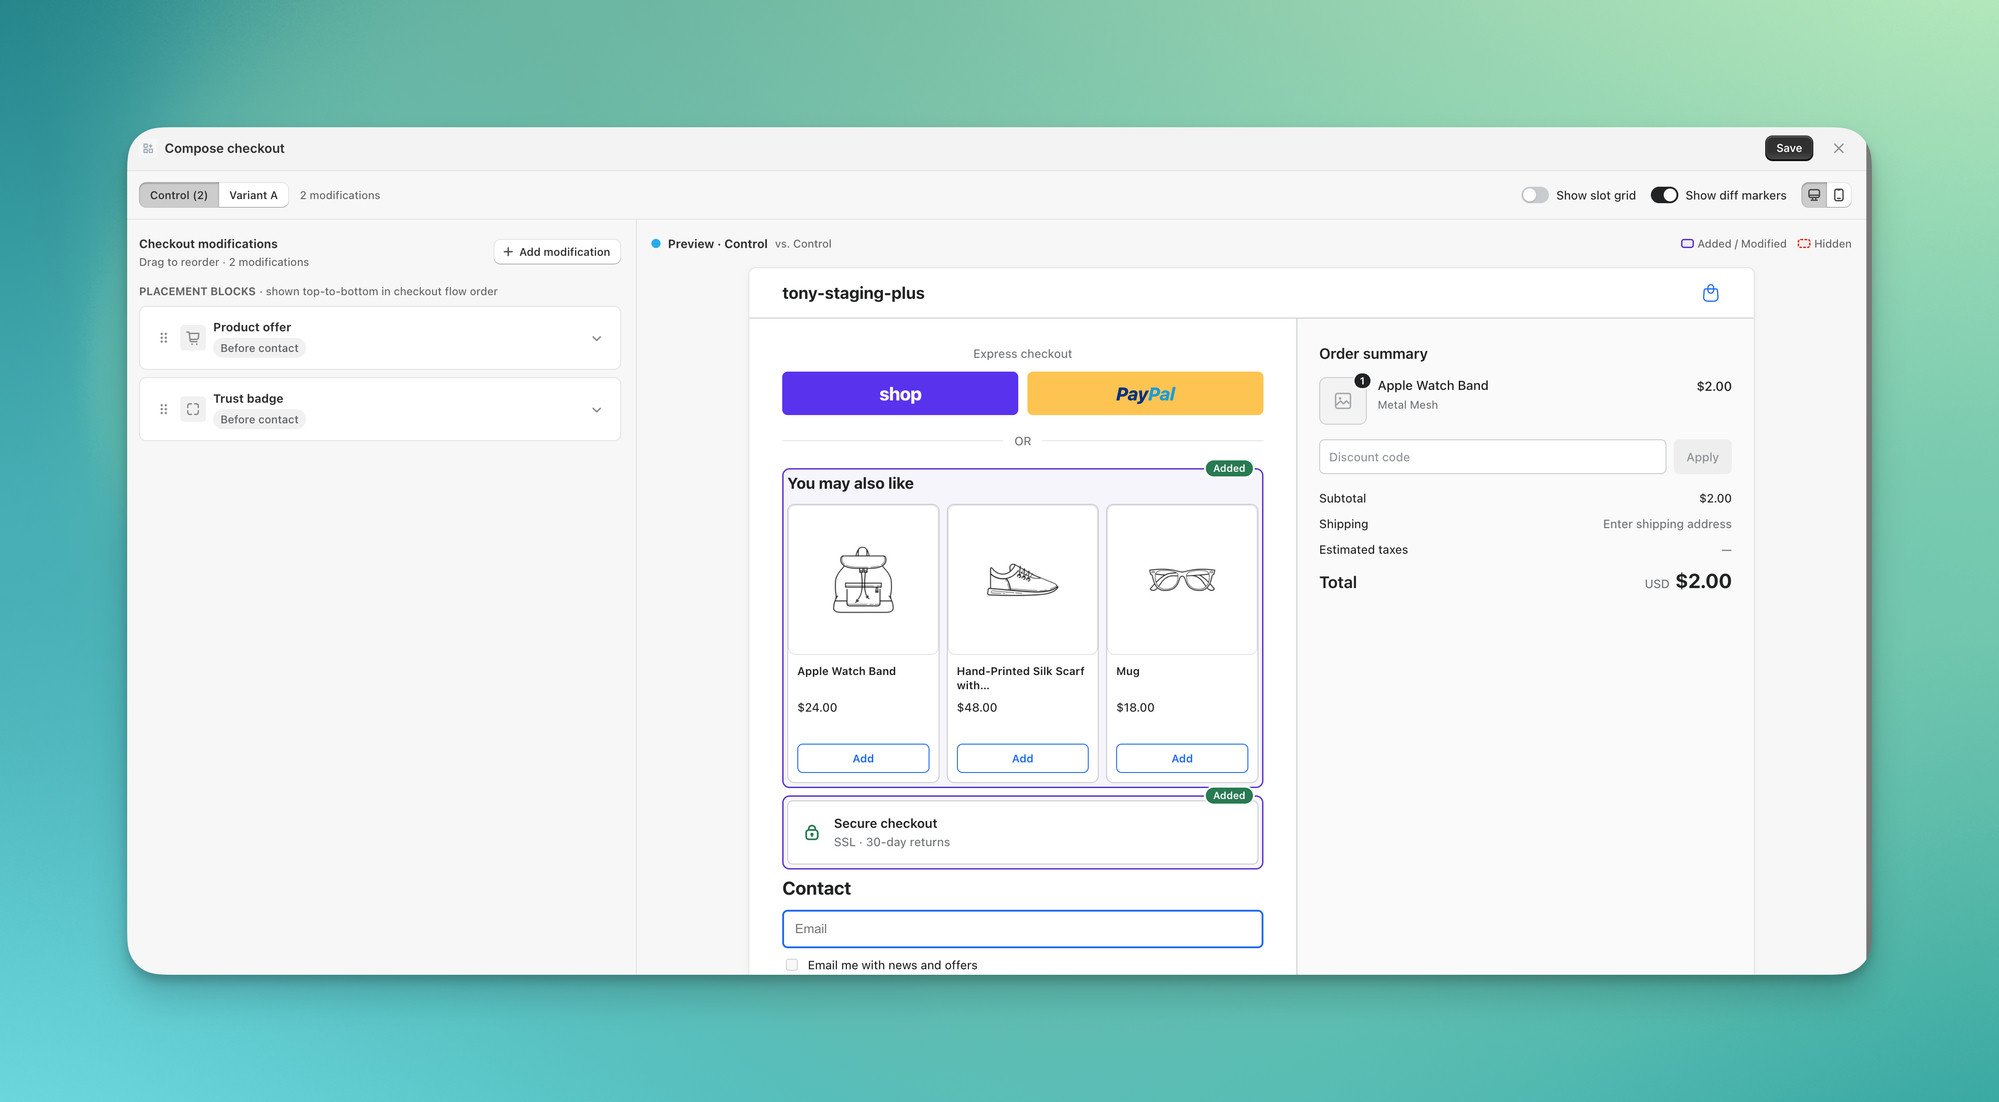
    Open the **Compose checkout** editor for a group, click **Add modification**, pick a category, and configure it.

    A live preview on the right updates as you build, and the tabs at the top switch which group you're previewing. It's an approximation of your checkout; confirm the real thing on your storefront before launch (see [Preview on your storefront](#preview-on-your-storefront)).
    <Frame caption="Compose checkout editor with live preview.">
      <img src="https://mintcdn.com/abconvert/AyyrFayJ3WDTY1DM/images/checkout-test-compose-preview.jpeg?fit=max&auto=format&n=AyyrFayJ3WDTY1DM&q=85&s=c6b20de6f8ea8496578561591ee6fedd" alt="Compose checkout editor showing a live preview with Added badges on an upsell block and a trust badge" width="1999" height="1102" data-path="images/checkout-test-compose-preview.jpeg" />
    </Frame>

    Two toggles help while you build:

    * **Show diff markers** flags how the group differs from the original checkout page: **Added** and **Modified** blocks get a solid ring, **Hidden** ones a dashed ring.
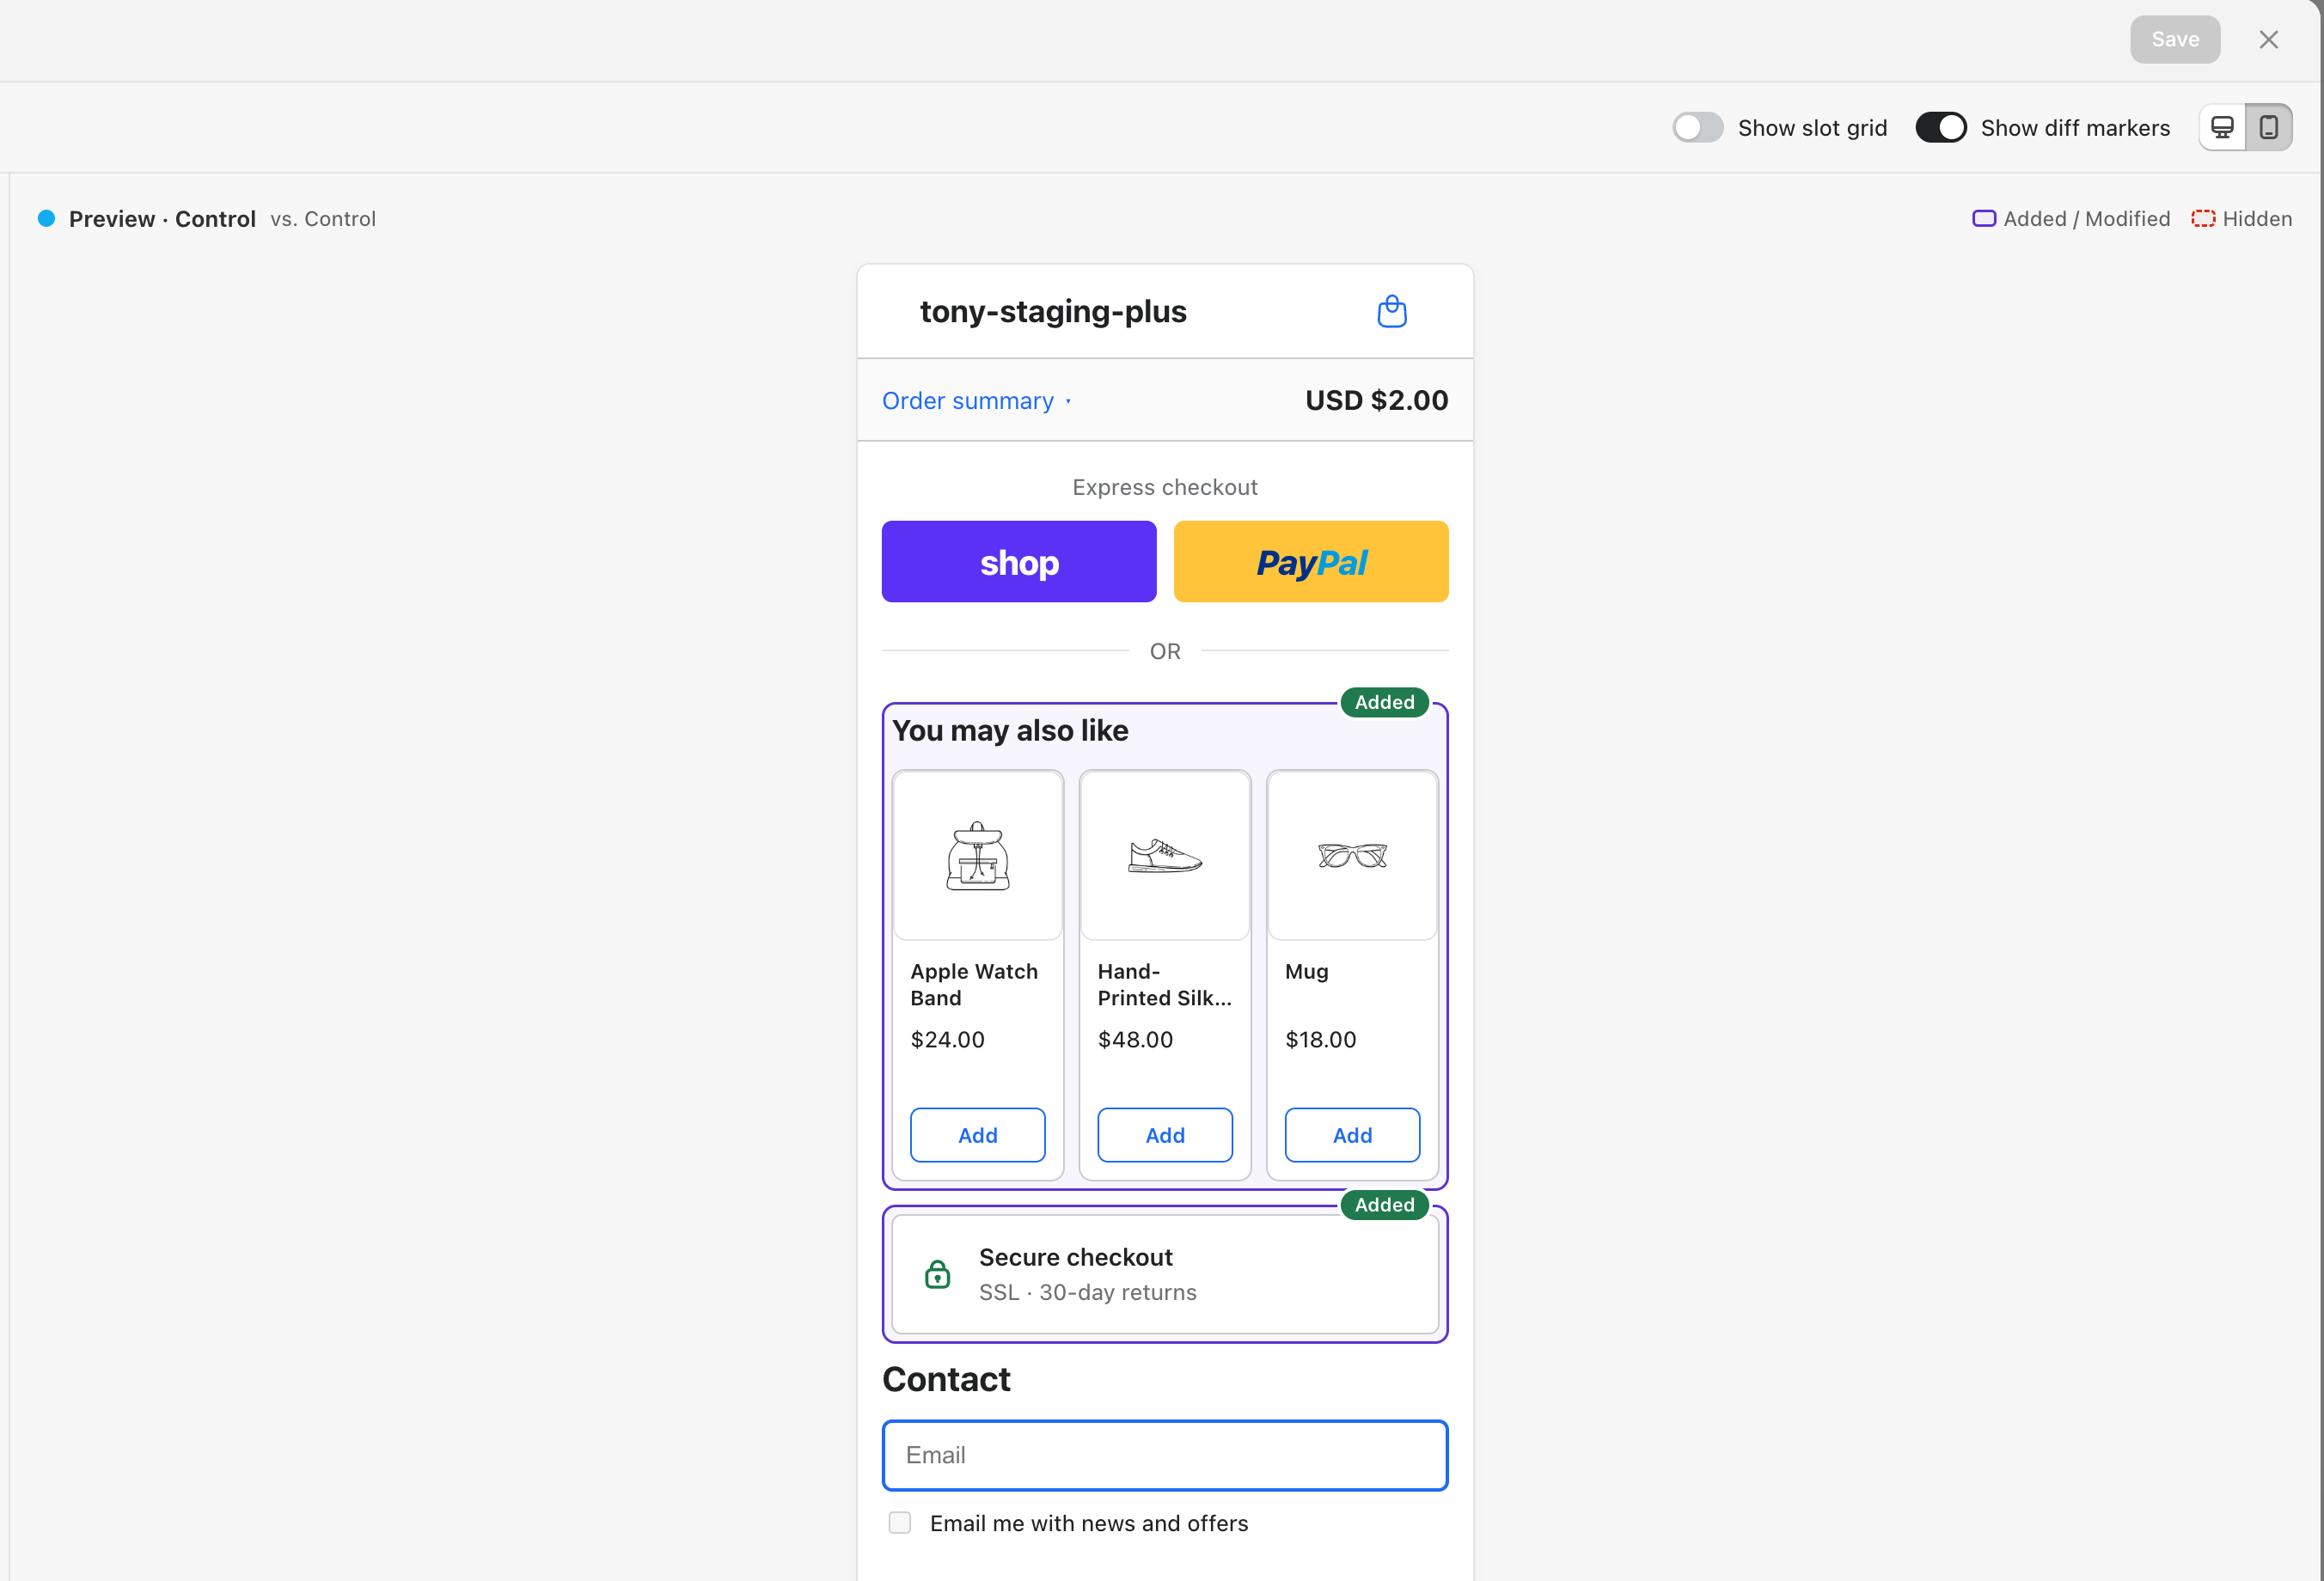
    * **Desktop / Mobile** switches the viewport.

    <Info>
      Check the **Mobile** viewport too. Most checkout traffic is on mobile, and the desktop and mobile views can differ, so a block that looks right on one may not on the other.
    </Info>

    <Frame caption="Mobile viewport preview.">
      <img src="https://mintcdn.com/abconvert/AyyrFayJ3WDTY1DM/images/checkout-test-compose-preview-mobile.png?fit=max&auto=format&n=AyyrFayJ3WDTY1DM&q=85&s=2f0a1ee3187981ce45cd9db2f2095576" alt="Compose checkout preview in the mobile viewport with a collapsed order summary bar" width="2704" height="1840" data-path="images/checkout-test-compose-preview-mobile.png" />
    </Frame>
  </Step>

  <Step title="Save and add your blocks">
    Click **Save**. ABConvert shows a card listing the blocks to add in the Shopify checkout editor. See [Add your blocks](#add-your-blocks-in-the-checkout-editor).
  </Step>

  <Step title="Preview and launch">
    Preview every group on your storefront to confirm each renders correctly, then click **Launch test**. See [Preview on your storefront](#preview-on-your-storefront).
  </Step>
</Steps>

## Add your blocks in the checkout editor

<Info>
  Add the listed blocks exactly where ABConvert shows them, or your test won't render.
</Info>

<Frame caption="Adding ABConvert blocks and pasting Block IDs in the checkout editor.">
  <video
    autoPlay
    muted
    loop
    playsInline
    controls
    className="w-full rounded-xl"
    src="https://mintcdn.com/abconvert/wlyz9DNrAG0gOR0e/images/checkout-test-editor-block-id.mp4?fit=max&auto=format&n=wlyz9DNrAG0gOR0e&q=85&s=a3cca9356583703c39b1e7697831ed3c"
    onLoadedMetadata={(e) => {
  e.currentTarget.playbackRate = 1.25;
}}
    data-path="images/checkout-test-editor-block-id.mp4"
  />
</Frame>

Content, Cart, and Upsell modifications render through ABConvert blocks you place in Shopify's checkout editor. (Delivery and Payment modifications apply automatically, with no block to add.) After you save, the **Add your blocks** card lists two kinds of block:

* **ABConvert Checkout Block** renders your Content and Upsell modifications. Add one at each placement the card lists.
* **ABConvert Cart Control** renders your Cart modifications. Add one in **Order summary**.

<Tabs>
  <Tab title="ABConvert Checkout Block">
    <Frame caption="Placement guide for the ABConvert Checkout Block.">
      <img src="https://mintcdn.com/abconvert/wlyz9DNrAG0gOR0e/images/checkout-test-add-blocks-checkout-block.png?fit=max&auto=format&n=wlyz9DNrAG0gOR0e&q=85&s=1d539db8ed4a7d7e96ce323e65a7fff0" alt="Add your blocks card with the ABConvert Checkout Block highlighted, its Block ID and Copy ID button, and the editor guide spotlighting where the block renders" width="1756" height="1660" data-path="images/checkout-test-add-blocks-checkout-block.png" />
    </Frame>
  </Tab>

  <Tab title="ABConvert Cart Control">
    <Frame caption="Placement guide for the ABConvert Cart Control.">
      <img src="https://mintcdn.com/abconvert/wlyz9DNrAG0gOR0e/images/checkout-test-add-blocks-cart-control.png?fit=max&auto=format&n=wlyz9DNrAG0gOR0e&q=85&s=b6b2c2b95c0ebd5c0cb5391a4534c774" alt="Add your blocks card with the ABConvert Cart Control highlighted, its Mark as added toggle, and the editor guide spotlighting the cart lines in Order summary" width="1746" height="1650" data-path="images/checkout-test-add-blocks-cart-control.png" />
    </Frame>
  </Tab>
</Tabs>

**What a Block ID is.** Each Checkout Block placement has a short code like `before-contact-bpa`. It links a block you add in Shopify's checkout editor back to the modifications you configured for that spot in ABConvert. You paste the Block ID into the block's settings so ABConvert knows what to render there. Each Block ID belongs to exactly one placement.

<Steps>
  <Step title="Open the Shopify checkout editor">
    Click **Open checkout editor** on the card. It opens the editor in a new tab, jumped to the **Apps** tab, so ABConvert stays open beside it.
  </Step>

  <Step title="Place a Checkout Block and paste its Block ID">
    Click **Add app block**, open **ABConvert Checkout Test**, and add an **ABConvert Checkout Block** at each placement the card lists. Then paste that placement's **Block ID** into the block's **Block ID** field in the checkout editor's settings panel.
  </Step>

  <Step title="Add the Cart Control block (if you test Cart modifications)">
    Add **ABConvert Cart Control** in the **Order summary** section. It has no Block ID and renders its controls on each cart line automatically.
  </Step>

  <Step title="Save, then check each placement off in ABConvert">
    Click **Save** in the checkout editor (blocks aren't applied until you save), then return to ABConvert and check off each placement on the card.
  </Step>
</Steps>

### Check each group renders in the editor

While you're in the checkout editor, each ABConvert block shows a **Preview** header with its Block ID and a **Variant** dropdown. Switch the dropdown to render each group's content and confirm your blocks land in the right spot. If a group has no modification for a block, it shows a **Block hidden** banner.

<Frame caption="The Variant dropdown in a block Preview header.">
  <img src="https://mintcdn.com/abconvert/AyyrFayJ3WDTY1DM/images/checkout-test-variant-switcher.png?fit=max&auto=format&n=AyyrFayJ3WDTY1DM&q=85&s=98859b2d7d8abf6daff4a895584bc60b" alt="ABConvert Checkout Block Preview header with a Variant dropdown showing Control and Variant A" width="1118" height="436" data-path="images/checkout-test-variant-switcher.png" />
</Frame>

<Tip>
  If you change modifications in ABConvert while the checkout editor is open, refresh the editor to load the latest version.
</Tip>

## Preview on your storefront

Before launching, walk the full shopper path to checkout on your real storefront, as any group you choose. This is the standard pre-launch preview for every ABConvert test type. See [Preview before you launch](/experiments/lifecycle#preview-before-you-launch).

1. In the **Preview Test** card on the review step, click **Open**.
2. An **ABConvert Preview** widget appears. Choose the group you want to walk through as.
3. Browse to your cart and checkout. The blocks render the same way a real shopper would see them.

<Frame caption="The storefront preview flow.">
  <img src="https://mintcdn.com/abconvert/AyyrFayJ3WDTY1DM/images/checkout-test-live-preview.gif?s=fe21efe50e61942197149e5e4be480cf" alt="Storefront homepage with the ABConvert Preview widget showing the checkout test groups Control and Variant A at a 50/50 split" width="800" height="413" data-path="images/checkout-test-live-preview.gif" />
</Frame>

<Note>
  Preview is only visible to you. Real shoppers never see the test while it's in Preview.
</Note>

## Reading your results

Open the [Analytics dashboard](/analytics/overview) to compare Control against each variant. ABConvert tracks the checkout funnel step by step, so you can see where each variant drops off. You can also add [custom funnel steps](/analytics/overview#custom-funnel-steps) to measure stages specific to your checkout.

<Frame caption="The session-based conversion funnel.">
  <img src="https://mintcdn.com/abconvert/AyyrFayJ3WDTY1DM/images/checkout-test-results.png?fit=max&auto=format&n=AyyrFayJ3WDTY1DM&q=85&s=4f4e626a9dcbd3a0da9081af5e80cd09" alt="Session-based conversion funnel comparing Control and Variant A across sessions, added to cart, reached checkout, submitted payment, and completed checkout" width="2186" height="1306" data-path="images/checkout-test-results.png" />
</Frame>

| Metric                  | What it tells you                                                                     |
| ----------------------- | ------------------------------------------------------------------------------------- |
| **Conversion rate**     | Share of visitors who complete the order. The primary signal for most checkout tests. |
| **Order count**         | Completed orders credited to each variant.                                            |
| **Revenue**             | Total revenue from each variant's completed orders.                                   |
| **Average order value** | Revenue divided by order count, useful for upsell or shipping tests.                  |

For full definitions and how significance is calculated, see [Metrics](/analytics/metrics).

<Tip>
  Checkout tests often reach significance faster than storefront tests, because only high-intent visitors who reach checkout are counted.
</Tip>

## Common mistakes

<Warning>
  Launching without adding the blocks in the checkout editor. Your variants render nothing. Complete [Add your blocks](#add-your-blocks-in-the-checkout-editor) first.
</Warning>

* **Pasting a Block ID into the wrong placement.** Block IDs are placement-specific, so a mismatched ID renders the wrong content or nothing.
* **Forgetting the ABConvert Cart Control block.** Cart modifications only appear if the block is added in **Order summary**.
* **Not previewing every variant.** Checking only one group hides a broken placement in another. Preview them all before launching.

## Checkout test FAQs

<AccordionGroup>
  <Accordion title="Why isn't my test showing at checkout?">
    Almost always because the blocks weren't added in the checkout editor, or a Block ID was pasted into the wrong placement. Follow [Add your blocks](#add-your-blocks-in-the-checkout-editor): add a Checkout Block at each placement, paste the matching Block ID, and add the Cart Control block in **Order summary** if you use Cart modifications.
  </Accordion>

  <Accordion title="A block shows 'Block hidden in this variant'. Is that a problem?">
    No. It means the selected variant has no modification for that block, so customers in it won't see the block. Switch the dropdown to another variant to confirm it renders there.
  </Accordion>

  <Accordion title="Will my preview sessions affect my results?">
    No. Preview sessions bypass your traffic and audience rules and are excluded from analytics.
  </Accordion>

  <Accordion title="Do visitors keep the same variant when they come back?">
    Yes. Once assigned, a visitor sees the same checkout for the duration of the test.
  </Accordion>
</AccordionGroup>
