> ## Documentation Index
> Fetch the complete documentation index at: https://docs.abconvert.io/llms.txt
> Use this file to discover all available pages before exploring further.
# Set Up Custom Events
> Create and verify custom events for storefront actions that Shopify's standard web pixel events do not cover.
Custom events let you measure storefront actions that matter to your test but are not covered by Shopify's standard web pixel events.
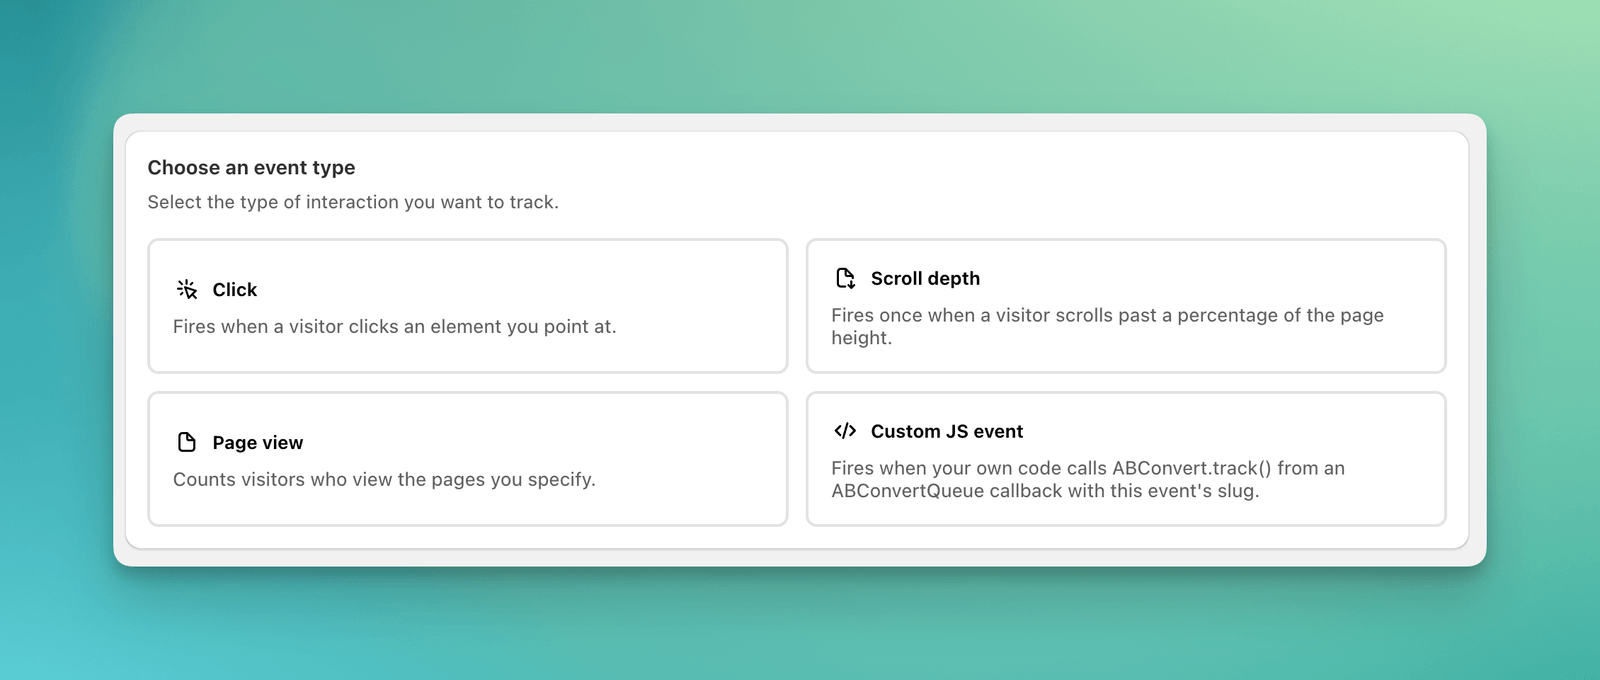
ABConvert supports four custom event types:
| Event type | Use it to track |
| --------------- | -------------------------------------------------------------------------------------------- |
| Click | A visitor clicks a specific storefront element. |
| Scroll depth | A visitor reaches a percentage of a page. |
| Page view | A visitor opens a page that matches a required URL scope. |
| Custom JS event | Your storefront code reports a successful action that the other event types cannot describe. |
## When to use custom events
Use a custom event when the action is important to your test and can be defined clearly. Good examples include clicking a size guide, reaching 75% of a long landing page, viewing a subscription page, or completing a custom product builder.
## When not to use custom events
Do not create a custom event for a standard metric that ABConvert already reports, such as Added to Cart, Reached Checkout, or Completed Checkout. Standard metrics have built-in definitions and are easier to compare across tests.
Do not use a custom event as your only evidence for a winner. Custom event results are directional and do not include statistical significance.
## How custom events work
An active event listens for its saved condition on matching storefront pages. ABConvert uses the event definition for operational health signals and for eligible test Analytics. The same event can be used in more than one test.
## Before you start
Custom events depend on the **ABConvert** theme connection and web pixel. Keep both enabled while you verify the event and run your test.
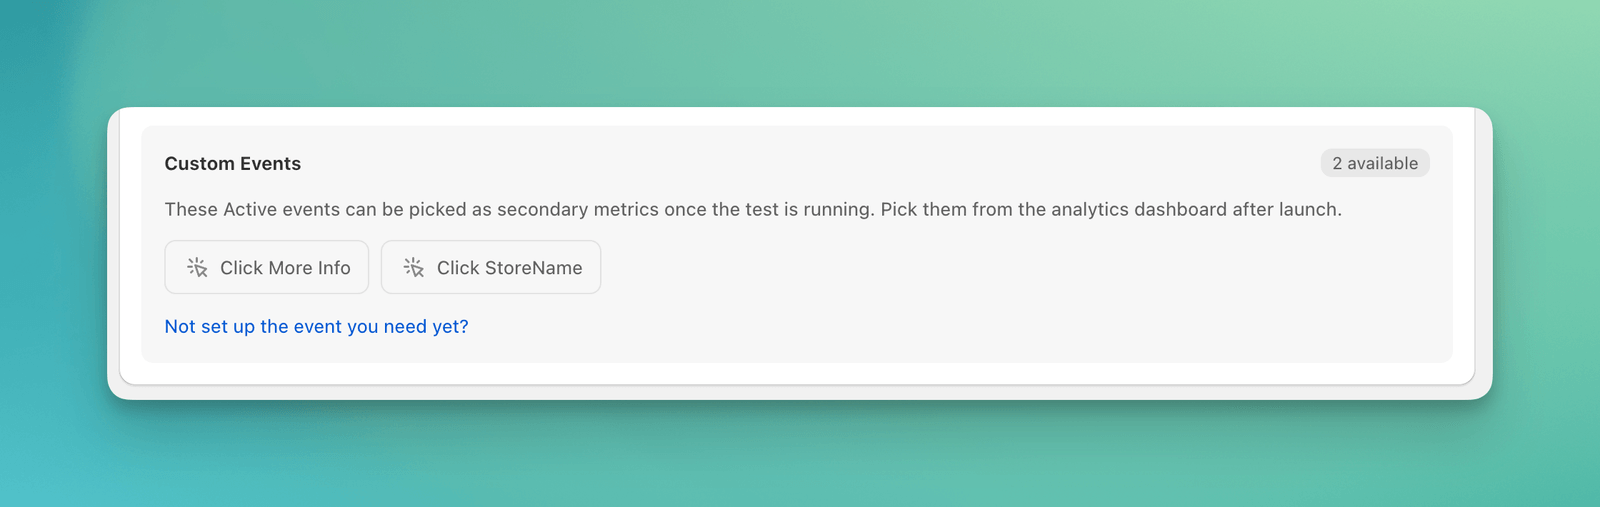
An event must exist before a test starts and remain **Active** until that test ends. You can choose the event for a test after launch, but you cannot use an event that was created after the test started.
Create and verify the events you need before you launch a test. Archive them only after every test that uses them has ended. Archiving an event during a running test stops collection and removes that event from the test's custom event results.
## Understand the custom event library
Open **Custom Events** in ABConvert to see the event library. The columns describe both the event setup and its recent activity:
* **Event name** identifies the event. The line below it shows how many running tests currently report the event.
* **Type** shows whether the event tracks a click, scroll depth, page view, or Custom JS event.
* **First signal** is the first accepted trigger ABConvert received for the event.
* **Last triggered** is the most recent accepted trigger. This timestamp can take about 60 seconds to update.
* **Triggers 24h** is a rolling count of accepted triggers from roughly the last 24 hours. It is a raw debugging count, not a unique visitor or session metric.
* **Status** is either **Active** or **Archived**.
Use **First signal**, **Last triggered**, and **Triggers 24h** to confirm that an event started firing, still fires, and behaves as expected over time. These health signals are separate from test Analytics.
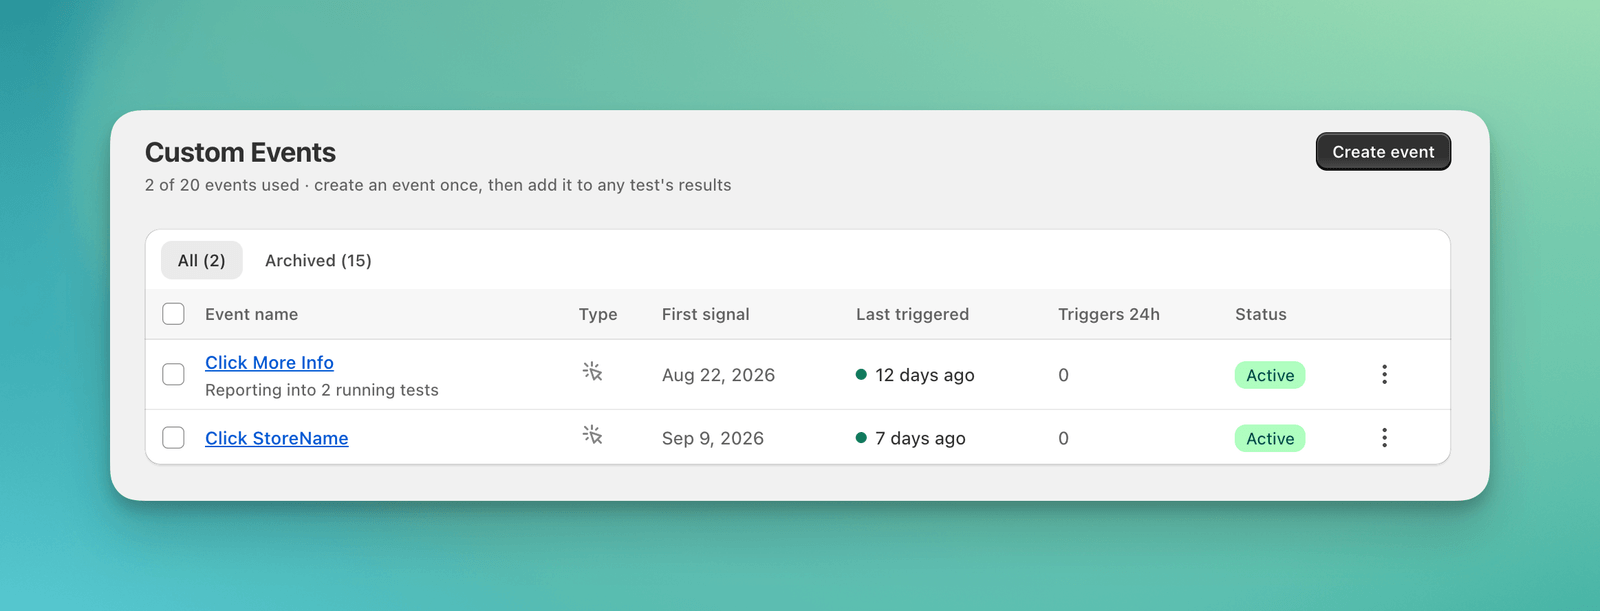 An **Active** event can fire on storefront pages where its conditions and page scope match. An **Archived** event no longer collects new triggers. You can keep up to 20 events active at once.
## Create a custom event
Click **Create event** in the custom event library.
Select **Click**, **Scroll depth**, **Page view**, or **Custom JS event**.
Give the event a clear name, then add the fields required for its type. Event names can contain up to 50 characters.
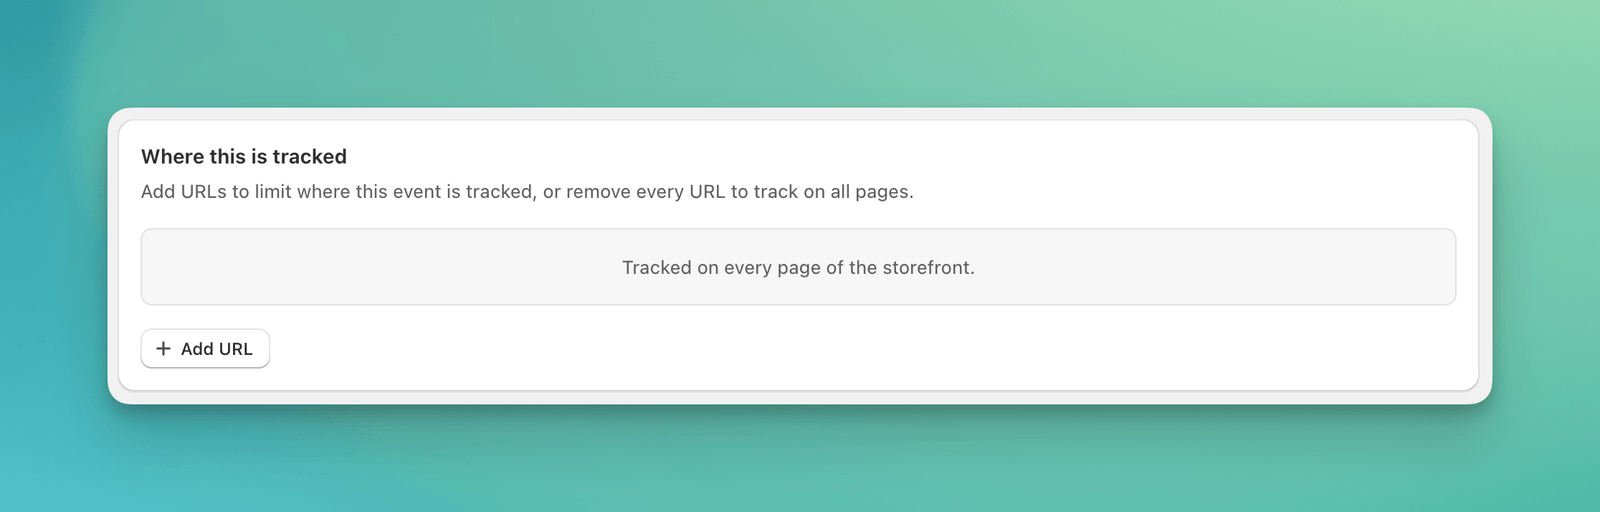
Add URL rules when the event should fire only on certain pages. Page scope is optional for Click, Scroll depth, and Custom JS events. It is required for Page view events.
Save the event, trigger it on your storefront, and confirm that its activity columns update before you launch a test.
An **Active** event can fire on storefront pages where its conditions and page scope match. An **Archived** event no longer collects new triggers. You can keep up to 20 events active at once.
## Create a custom event
Click **Create event** in the custom event library.
Select **Click**, **Scroll depth**, **Page view**, or **Custom JS event**.
Give the event a clear name, then add the fields required for its type. Event names can contain up to 50 characters.
Add URL rules when the event should fire only on certain pages. Page scope is optional for Click, Scroll depth, and Custom JS events. It is required for Page view events.
Save the event, trigger it on your storefront, and confirm that its activity columns update before you launch a test.
 ### Click event
Use a Click event to track clicks on a specific storefront element, such as a button, link, image, or product option.
1. Enter an **Event name**.
2. Open **Element Picker** and navigate to the page that contains the element.
3. Click the element you want to track. ABConvert adds its CSS selector to the event setup.
4. Check the number of matching elements in the picker.
5. Add an optional [page scope](#set-the-page-scope).
6. Create the event.
The click listener also counts clicks on child content inside the selected element. It can detect matching elements that the page adds after it loads. The event records at most once per page load.
You can also enter a valid CSS selector directly. If the picker reports no matches, check the selector on the intended page before relying on the event.
### Click event
Use a Click event to track clicks on a specific storefront element, such as a button, link, image, or product option.
1. Enter an **Event name**.
2. Open **Element Picker** and navigate to the page that contains the element.
3. Click the element you want to track. ABConvert adds its CSS selector to the event setup.
4. Check the number of matching elements in the picker.
5. Add an optional [page scope](#set-the-page-scope).
6. Create the event.
The click listener also counts clicks on child content inside the selected element. It can detect matching elements that the page adds after it loads. The event records at most once per page load.
You can also enter a valid CSS selector directly. If the picker reports no matches, check the selector on the intended page before relying on the event.
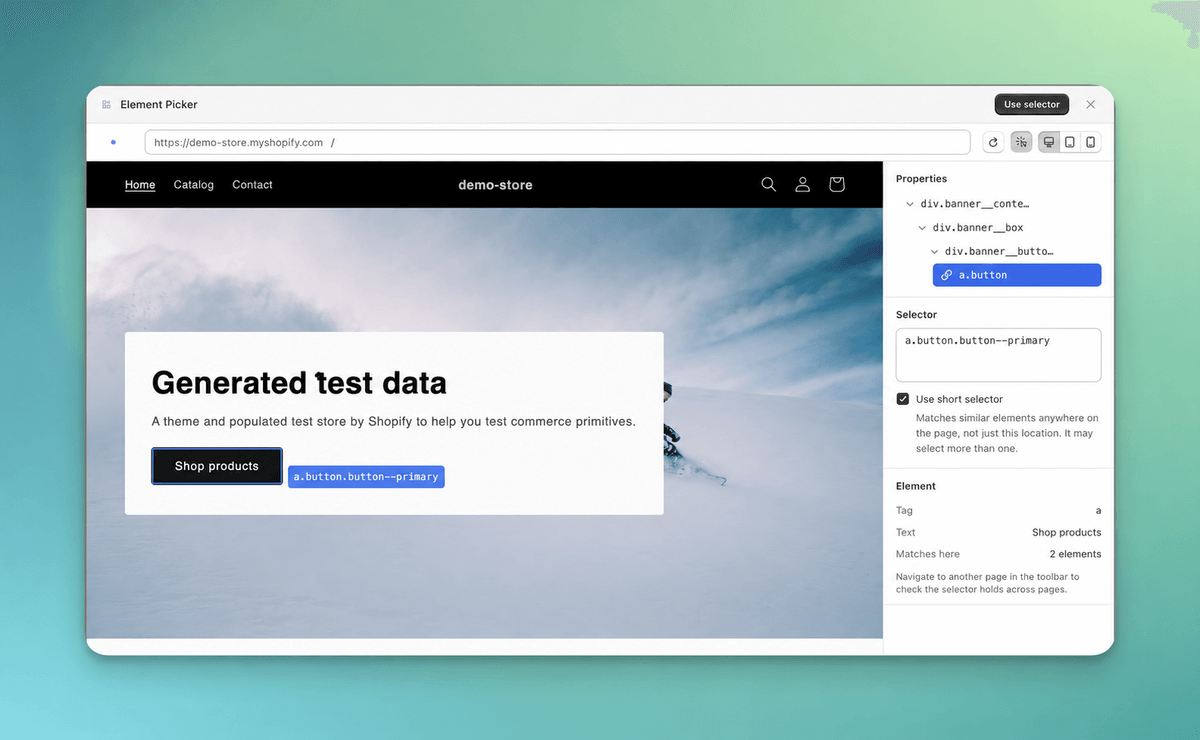 **Use short selector** is selected by default. It keeps the last part of the CSS selector, which can match similar elements elsewhere on the page. If you need one exact location, clear **Use short selector** and verify that the full selector matches only the intended element.
### Scroll depth event
Use a Scroll depth event to learn whether a visitor reached a meaningful point on a page. It is an engagement signal, not proof that the visitor read the content.
1. Enter an **Event name**.
2. Set a scroll depth from 1% to 100%. The default is 75%.
3. Add an optional [page scope](#set-the-page-scope).
4. Create the event.
The event fires when the visitor first reaches the selected depth and records at most once per page load.
### Page view event
Use a Page view event when opening a particular page is the action you want to measure.
1. Enter an **Event name**.
2. Add at least one page URL rule. This required page scope defines the event.
3. Create the event.
The page URL is the only event-specific setting. If you add more than one URL rule, a page can match any one of them.
### Custom JS event
Use a Custom JS event when your storefront code knows that an action succeeded, but Click, Scroll depth, or Page view cannot describe it reliably.
Creating the event registers its name and slug in ABConvert. It does not track anything by itself. Copy the JavaScript shown for the event and run it in your storefront code at the moment the action succeeds.
```js theme={null}
window.ABConvertQueue = window.ABConvertQueue || [];
window.ABConvertQueue.push(function (ABConvert) {
ABConvert.track('product_builder_completed');
});
```
The example reports a completed product builder. Replace `product_builder_completed` with the exact slug shown in ABConvert. Calls with an unknown or archived slug are ignored. A Custom JS event records at most once per page load, even if your code calls it more than once.
A Custom JS slug remains reserved after archive. Give a replacement event a distinct name and update your storefront code to use its new slug.
You can also add an optional [page scope](#set-the-page-scope). ABConvert checks that scope when the page loads and ignores calls from pages outside it. See [Track custom JS events](/api-reference/browser-api#track-custom-js-events) on the JavaScript API page.
## Set the page scope
Page scope controls which storefront URLs can trigger an event:
* **Exactly matches** matches one storefront path, such as `/pages/size-guide`.
* **Starts with** includes paths that begin with the value.
* **Contains** includes paths that contain the value.
Multiple URL rules use OR logic, so a page can match any one rule.
For Click, Scroll depth, and Custom JS events, page scope is optional. Leave it blank to allow the event on every storefront page where its other conditions match. For a Page view event, you must add at least one URL rule because the page itself is the trigger.
**Use short selector** is selected by default. It keeps the last part of the CSS selector, which can match similar elements elsewhere on the page. If you need one exact location, clear **Use short selector** and verify that the full selector matches only the intended element.
### Scroll depth event
Use a Scroll depth event to learn whether a visitor reached a meaningful point on a page. It is an engagement signal, not proof that the visitor read the content.
1. Enter an **Event name**.
2. Set a scroll depth from 1% to 100%. The default is 75%.
3. Add an optional [page scope](#set-the-page-scope).
4. Create the event.
The event fires when the visitor first reaches the selected depth and records at most once per page load.
### Page view event
Use a Page view event when opening a particular page is the action you want to measure.
1. Enter an **Event name**.
2. Add at least one page URL rule. This required page scope defines the event.
3. Create the event.
The page URL is the only event-specific setting. If you add more than one URL rule, a page can match any one of them.
### Custom JS event
Use a Custom JS event when your storefront code knows that an action succeeded, but Click, Scroll depth, or Page view cannot describe it reliably.
Creating the event registers its name and slug in ABConvert. It does not track anything by itself. Copy the JavaScript shown for the event and run it in your storefront code at the moment the action succeeds.
```js theme={null}
window.ABConvertQueue = window.ABConvertQueue || [];
window.ABConvertQueue.push(function (ABConvert) {
ABConvert.track('product_builder_completed');
});
```
The example reports a completed product builder. Replace `product_builder_completed` with the exact slug shown in ABConvert. Calls with an unknown or archived slug are ignored. A Custom JS event records at most once per page load, even if your code calls it more than once.
A Custom JS slug remains reserved after archive. Give a replacement event a distinct name and update your storefront code to use its new slug.
You can also add an optional [page scope](#set-the-page-scope). ABConvert checks that scope when the page loads and ignores calls from pages outside it. See [Track custom JS events](/api-reference/browser-api#track-custom-js-events) on the JavaScript API page.
## Set the page scope
Page scope controls which storefront URLs can trigger an event:
* **Exactly matches** matches one storefront path, such as `/pages/size-guide`.
* **Starts with** includes paths that begin with the value.
* **Contains** includes paths that contain the value.
Multiple URL rules use OR logic, so a page can match any one rule.
For Click, Scroll depth, and Custom JS events, page scope is optional. Leave it blank to allow the event on every storefront page where its other conditions match. For a Page view event, you must add at least one URL rule because the page itself is the trigger.
 ## Verify an event before launch
Open your storefront and perform the action once. Then return to the custom event library and check:
1. **First signal** appears for a new event.
2. **Last triggered** reflects the recent action. Allow about 60 seconds for this column to update.
3. **Triggers 24h** increases when a new page load produces another accepted trigger.
The 24-hour count includes raw storefront triggers from outside tests. It does not equal the unique visitor or session counts in Analytics. Custom event Analytics is processed separately and is not real-time.
In the test creation wizard, the final **Review and launch** step lists your active custom events before you click **Launch test**. This list helps you check which events are ready before the test starts. It does not select events for reporting. After launch, use **Manage custom metrics** in the test's Analytics dashboard to choose which eligible events to report.
## Verify an event before launch
Open your storefront and perform the action once. Then return to the custom event library and check:
1. **First signal** appears for a new event.
2. **Last triggered** reflects the recent action. Allow about 60 seconds for this column to update.
3. **Triggers 24h** increases when a new page load produces another accepted trigger.
The 24-hour count includes raw storefront triggers from outside tests. It does not equal the unique visitor or session counts in Analytics. Custom event Analytics is processed separately and is not real-time.
In the test creation wizard, the final **Review and launch** step lists your active custom events before you click **Launch test**. This list helps you check which events are ready before the test starts. It does not select events for reporting. After launch, use **Manage custom metrics** in the test's Analytics dashboard to choose which eligible events to report.
 ## Edit, duplicate, or archive an event
You can rename an event without changing its tracking slug. You cannot change its type, selector, scroll depth, or page scope after creation. Duplicate the event when you need a different setup, then verify the new event before using it in a future test.
Archived events cannot be restored. You can duplicate an archived event to create a new active event, but the new event is not eligible for a test that already started.
To stop tracking an event:
1. Open the event from the custom event library.
2. Click **Archive event**.
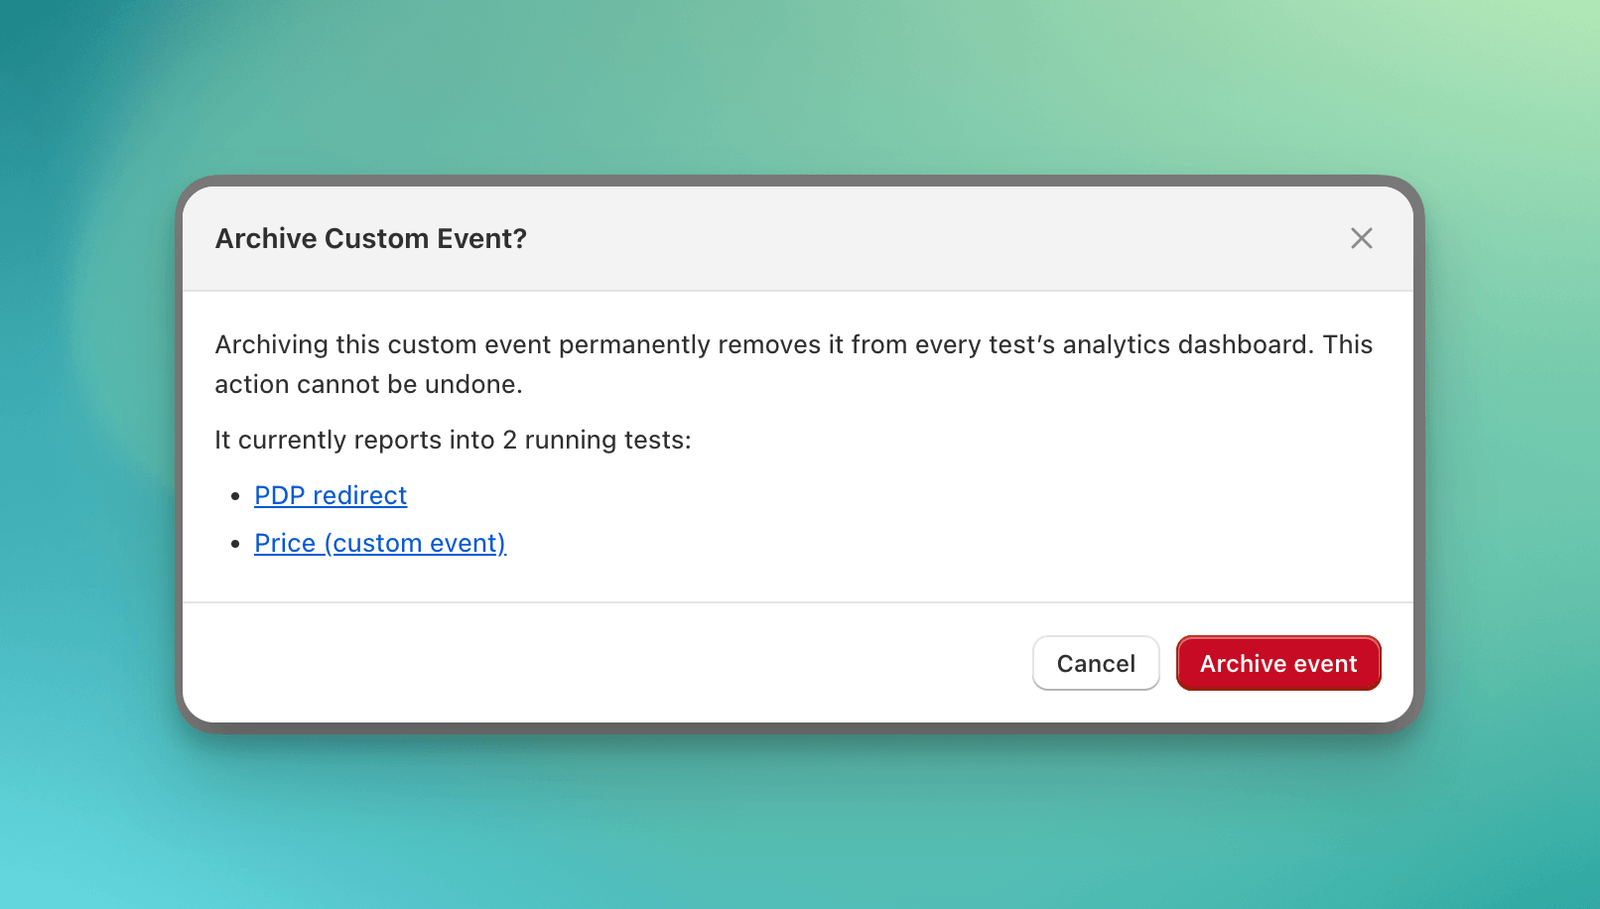
3. Review the warning and the listed running tests.
4. Click **Archive event** to confirm.
The event moves to the **Archived** tab and no longer counts toward the 20-active-event limit. Archive replaces deletion: the event definition remains available as a read-only record.
When you archive an event, ABConvert shows the running tests that report it. Archiving stops new collection and makes the event ineligible for those running tests. Results from a test that ended while the event was still active remain available.
## Edit, duplicate, or archive an event
You can rename an event without changing its tracking slug. You cannot change its type, selector, scroll depth, or page scope after creation. Duplicate the event when you need a different setup, then verify the new event before using it in a future test.
Archived events cannot be restored. You can duplicate an archived event to create a new active event, but the new event is not eligible for a test that already started.
To stop tracking an event:
1. Open the event from the custom event library.
2. Click **Archive event**.
3. Review the warning and the listed running tests.
4. Click **Archive event** to confirm.
The event moves to the **Archived** tab and no longer counts toward the 20-active-event limit. Archive replaces deletion: the event definition remains available as a read-only record.
When you archive an event, ABConvert shows the running tests that report it. Archiving stops new collection and makes the event ineligible for those running tests. Results from a test that ended while the event was still active remain available.
 ## Common mistakes
* **Creating the event after launch.** A new event cannot be added to a test that already started.
* **Archiving before the test ends.** The event becomes ineligible for the whole running test, not only for future dates.
* **Treating Triggers 24h as an Analytics metric.** It is a raw health signal and is not deduplicated by visitor or session.
* **Using a broad click selector.** Check the match count, or clear **Use short selector** when you need one exact element.
* **Registering a Custom JS event without calling its code.** The dashboard creates the event definition, but your storefront must call `ABConvert.track()`.
* **Expecting repeat actions on one page to add repeat triggers.** Click, Scroll depth, and Custom JS events record at most once per page load.
## Next step
See [Use Custom Events in Analytics](/analytics/custom-event-results) to add an event to a visitor filter, the session-based funnel, or the Custom Events results section.
## FAQ
Check whether the event was created before the test started. Only events created before the test started can appear in that test's Analytics.
Yes. The event must have been created before the test started and must stay active until the test ends. Open **Manage custom metrics** in Analytics to add it.
No. Duplicate it to create a new active event. The duplicate is a new event and cannot be added to a test that already started.
The library columns are operational health signals. Analytics uses processed test data and can take longer to update.
No. You can edit the name only. Duplicate the event and create a corrected setup for future tests.
## Common mistakes
* **Creating the event after launch.** A new event cannot be added to a test that already started.
* **Archiving before the test ends.** The event becomes ineligible for the whole running test, not only for future dates.
* **Treating Triggers 24h as an Analytics metric.** It is a raw health signal and is not deduplicated by visitor or session.
* **Using a broad click selector.** Check the match count, or clear **Use short selector** when you need one exact element.
* **Registering a Custom JS event without calling its code.** The dashboard creates the event definition, but your storefront must call `ABConvert.track()`.
* **Expecting repeat actions on one page to add repeat triggers.** Click, Scroll depth, and Custom JS events record at most once per page load.
## Next step
See [Use Custom Events in Analytics](/analytics/custom-event-results) to add an event to a visitor filter, the session-based funnel, or the Custom Events results section.
## FAQ
Check whether the event was created before the test started. Only events created before the test started can appear in that test's Analytics.
Yes. The event must have been created before the test started and must stay active until the test ends. Open **Manage custom metrics** in Analytics to add it.
No. Duplicate it to create a new active event. The duplicate is a new event and cannot be added to a test that already started.
The library columns are operational health signals. Analytics uses processed test data and can take longer to update.
No. You can edit the name only. Duplicate the event and create a corrected setup for future tests.